The most commonly used command in Ubuntu is apt-get. You can use it to install software, update the repository and upgrade the software. Without a doubt, “Apt-get” is a pretty handy tool and is very useful and good for what it supposed to do, but “good” can always be enhanced into “better” and this can be easily achieved with “apt-fast”.
What is apt-fast?
apt-fast is a shellscript wrapper for “apt-get” and “aptitude” that can drastically improve APT download times by downloading packages with multiple connections per package. To verify this claim of “increasing package downloading speed” I ran a simple test by installing the web browser Midori using both apt-get and apt-fast.
The result for Apt-get is shown below:
Get:1 precise/main libunique-1.0-0 i386 1.1.6-4 [25.2 kB]
Get:2 precise/universe midori i386 0.4.3-1ubuntu1 [1,131 kB]
Fetched 1,156 kB in 1s (659 kB/s)
while apt-fastresulted in:
Initializing download: pool/universe/m/midori/midori_0.4.3-1ubuntu1_i386.deb
File size: 1130792 bytes
Opening output file midori_0.4.3-1ubuntu1_i386.deb
Starting downloadConnection 2 finished ]
Connection 0 finished ]
Connection 3 finished ]
Connection 1 finished ]
Connection 5 finished ]
Connection 6 finished ]
Connection 7 finished ]
Connection 8 finished ]
Connection 4 finished ]
[100%] […………………………………………..] [1022.6KB/s] [00:00]Downloaded 1104.3 kilobytes in 1 second. (1022.64 KB/s)
As you can see, it increased the downloading from to 1022.64 kB/s in comparison to 659 kB/s. This (almost) two-fold increase in the downloading speed can be very significant while installing a large package.
How to install apt-fast?
apt-fast can be installed from its official ppa by using the following commands in terminal:
sudo add-apt-repository ppa:apt-fast/stable
sudo apt-get update
sudo apt-get install apt-fast axel
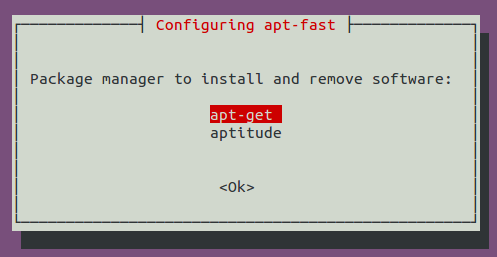
While using the last command to install “apt-fast axel”, a window will appear for you to configure apt-fast.
Note: if you do not know it already, to move between options here use tab and enter instead of click. To go to next page, use tab and enter to select Ok. In the first of 5 configuration pages, choose apt-get

In next page, choose axel:

Now choose the maximum number of simultaneous connections. The default value is 5. I have increased it to 10. You can decide what you want to place here. While the more the merrier, you won’t want to use too large a value that it jammed your network connection. A reasonable value would be between 5 – 15.

For the next 3 configuration pages, you don’t need to make any change. You can just select OK and proceed with the configuration:


Thats it. You are done with installation. If you need to configure apt-fast later sometime, you can do it by editing the “/etc/apt-fast.conf” file.
How to use apt-fast?
The answer is very simple, the same way as you use apt-get. All you need to do is to replace get by fast in all apt-get commands. Some useful commands would be:
- To install: sudo apt-fast install package_name
- To remove: sudo apt-fast remove package_name
- To update: sudo apt-fast update
- To upgrade: sudo apt-fast upgrade
apt-fast has almost all the apt-get features including tab auto competition. And you can also use apt-get along with apt-fast without any troubles.
Pretty cool eh? What do you think of apt-fast? Should it be available by default along with apt-get in official Ubuntu releases? Do let us know in the comments.


