Will it be wrong if we say that your iPhone knows more about your secrets than what your significant other? Hopefully not, because we are living in such a deep-tech world. Even though you might be taking all the sets of necessary precautions, your iPhone still has some credential information about your digital identity. This is one reason why you should be really careful when it comes to selling your used iPhone. Just think of this scenario:
You have been using your iPhone for around a year and you’ve connected it to iCloud. Apart from what you have stored in cloud, your iPhone is also home to your digital documents — from Word files to Photos and from favourite films to Videos. Let us say this for the last time: simply deleting your photos and videos does not make them irrecoverable. That’s why we need some specific steps.
You can do a bunch of things to ensure your privacy and security before you sell your old iPhone. It becomes a necessity if you have connected your common Apple account with the device. In this article, we have made a list of the things you should do before selling your iPhone, however old or unused it may be. Apart from a few steps to protect your privacy, there are some useful methods too. In case you already know erasing is an option, we’ve included the steps on how to erase complete data from iOS device.
#1 Back Up What is Important
Protecting unauthorized access and ensuring easy access are equally important when it comes to selling your iPhone. As far as easy access is concerned, make sure that you’re not missing anything important. Thanks to the simple interface of iTunes, you can selectively back up all the data you want. On the other hand, if you’d like to store things in the cloud, you can enable the Backup to iCloud as well. There is also a third option that lets you use third-party software for iOS backup. So, if you think iCloud and iTunes backup don’t do the job, you can count on third-party iPhone backup utilities. The point is that, it doesn’t matter which tool you use, make sure you have the important data stored somewhere safely.
#2 Disconnect your Apple ID
We are sure that you have connected your Apple ID with the iPhone, and this needs to be removed. This is the first step to make sure that the buyer will never have access to your Apple ID in any case. So, even if you have backed up all your data to iCloud, there is no need to worry. You can simply go to Settings and choose the Account options, where you will be able to disconnect the existing Apple account from the device. When you remove the account from the device, you are removing connected information as well. For instance, it’s also removing all the emails and calendar entries that are retrieved from the Apple ID. Of course, after this particular step, your iPhone will be less of an iPhone.
#3 Erase Complete iPhone Data
Now, this one is more complex than the previous steps. There are different ways to remove data from your iPhone,
- You can manually delete all your photos, videos, music and films — one by one
- Factory-Reset your iPhone, by which you remove all Settings and Content from the device
- You can use a professional-quality iOS Data Eraser for effective data removal
Out of the three, however, we recommend the professional method, due to various reasons. Most notably, the third method thoroughly cleans your iPhone and shreds all sorts of traceable information. This will make sure that your photos/videos/other data are irrecoverable by a third person. Dr. Fone Erase is such a tool to help you. And, the steps are simple as well.
Step One
First, you have to download and install Dr. Fone Erase in your Mac or Windows device. The current version is compatible with High Sierra and Windows 10, and the installation will be done in seconds.
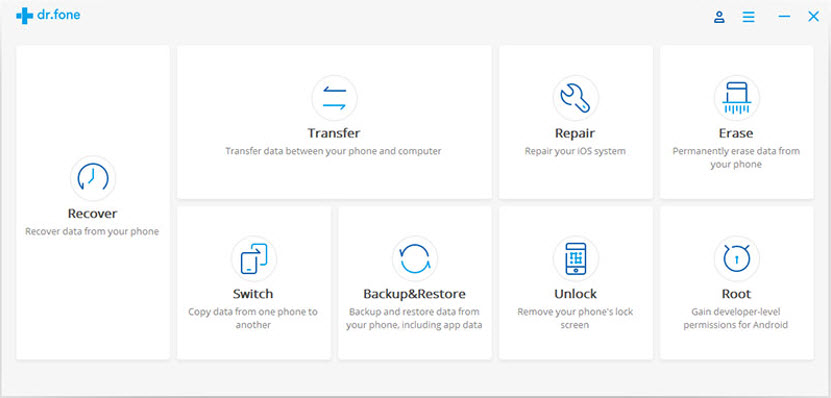
Step Two
Now, connect the iPhone that needs to be erased. Once Dr. Fone detects the device, it will show you two options — Erase Full Data and Erase Private Data.
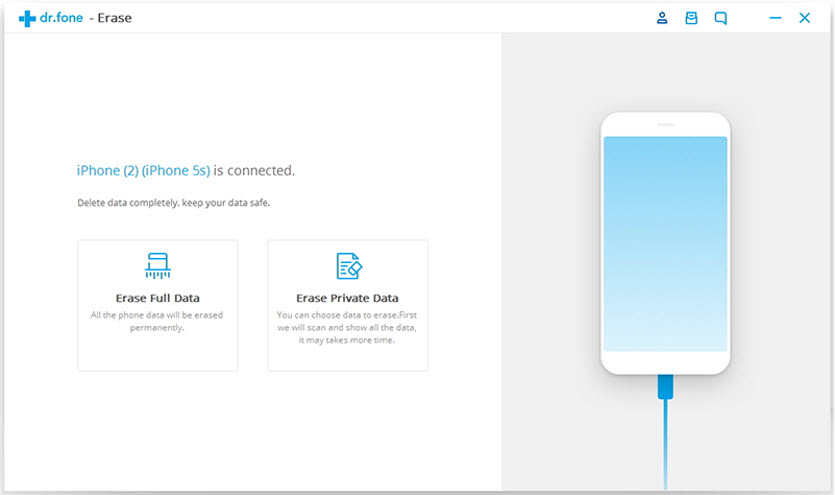
Because you are planning to sell the iPhone, go for Full Data Erasure.
Step Three
In the upcoming steps, you have to confirm your action. You have to press the Erase button once again and enter the word ‘delete’ on the corresponding screen to continue.
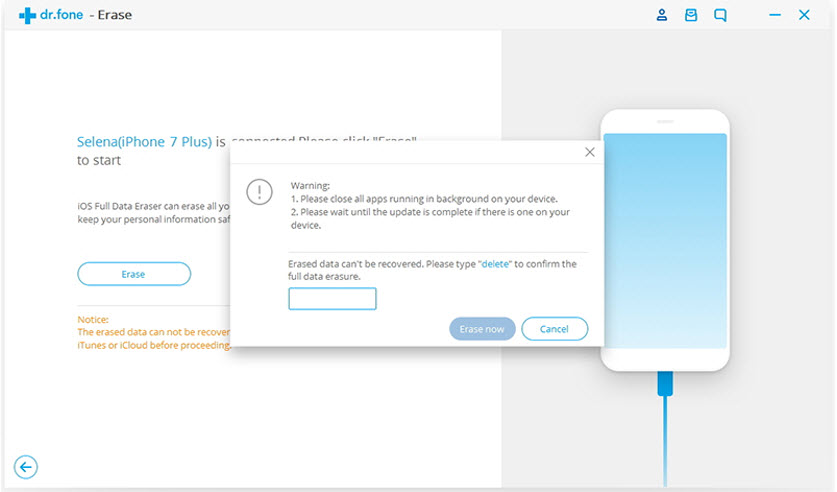
Now, you can wait till Dr. Fone Erase cleans your iPhone thoroughly and shreds everything. All types of data, including Photos, Music, Calendar, Call History and Reminder would be wiped off.
#4 Talk to Your Cellular Carrier
Did you purchase a locked version of iPhone and are still using the same carrier? Then, before you finalize it and sell the iPhone, you should have a talk with the carrier. Most importantly, make sure that the device has been successfully removed from the carrier account. This will save you from further issues if any. That having said, data security and privacy are ensured even without the fourth step. Still, just in case.
The Bottom Line
These are some important things you should know and do before selling your old iPhone. As you can see, all these steps have an impact on your privacy and data protection. That is, if you skip some of these steps, you can be in ultimate trouble. In short, if there is any kind of sensitive content in your iPhone, make sure that you erase it completely.
