Test infect your Enterprise JavaBeans
Learn how to test your J2EE components live and in the wild
We can never overtest software, but we seldom test it enough. When testing does begin, system or integration testing is the norm, with formal testing and quality assurance efforts typically starting at the last minute — when the software is nearing release. Inevitably, pressure builds on testers to rush through the testing process. Needless to say, this does not encourage thoroughness. At the same time, the development team is urged to fix defects as quickly as possible. This, too, does not promote careful attention to detail. When this process does produce high-quality software — a rare occurrence — it is the result of superhuman efforts by conscientious individuals.
Since a J2EE application is assembled from components, integration testing comes too late in the process. Individual components often behave differently when they are by themselves than when assembled with other components. To eliminate unexpected interactions, J2EE components must be unit tested before they are gathered into an application. This article discusses unit testing techniques and how to apply unit testing to J2EE components, particularly Enterprise JavaBeans (EJBs).
Note: The complete source code for this article, including JUnit 3.2 sources, the servlet interface, build scripts, the deployment descriptor, and the sample tests can be downloaded as a zip file in Resources.
Unit testing
If you are already test infected, skip to the next section. If not, you need to know about the benefits of real unit testing.
Unit testing is a critical, but often misunderstood, part of the software development process. Unit testing involves individually testing each small unit of code to ensure that it works on its own, independent of the other units. In object-oriented languages, a unit is often, but not always, equivalent to a class.
If developers knew for certain that each piece of the application works as it was designed to do, they would realize that problems with the assembled application must result from the way the components were put together. Unit testing tells developers that an application’s pieces are working as designed.
For example, if you were building a car, you would probably construct each of its many complex components separately. Unless you tested each piece individually before assembly, you would have a lot of trouble figuring out why the car doesn’t run correctly after it is put it together. For example, was the transmission built improperly, or did you hook it up incorrectly? Without having evaluated each piece beforehand, you have no way of knowing whether one or more of the pieces was built incorrectly, whether your integration was faulty, or both. Imagine the amount of time you would waste trying to analyze what was wrong with the car. And how much confidence would you have in its long-term reliability? If you had tested each component by itself before assembly, you would be able to focus your debugging efforts on the integration — the way you assembled the car. And since you would have confidence in the individual pieces of the car, you would have more confidence in the car as a whole.
For the same reasons, it is important to unit test software. But, just as you wouldn’t test the car parts without test-driving the completed car, you must also follow unit testing with integration testing and functional testing. Unit testing is just one part of a good, solid software development process.
Unit tests are typically organized into groups or suites of tests. A project’s unit test suites should always execute successfully at 100 percent. Any failure in the unit tests instantly becomes a top priority for responsible developers.
These unit tests are useful for programmers long before deployment. A wide-reaching unit test suite bolsters confidence by allowing developers to change the code without fear of breaking it. Any change that would break the code will immediately be caught by a unit test that fails. Also, though unit testing does not focus on code coverage, developers know which parts of the code are most likely to break and will test those parts more rigorously.
Unit testing at this level also catches problems long before any other testing method will reveal the defects. Developers will usually run the unit tests every 10 or 15 minutes. When a test fails, developers must debug only the last 10 minutes’ worth of changes at any one time. With other testing methods, developers sometimes must debug changes made over the span of several months.
Unit testing allows developers to start writing tests before writing the code.
The process works this way:
- Decide what the component should do.
- Design the component. This can be done formally or informally, depending on the complexity of the component.
- Write unit tests to confirm that behavior. At first, the tests will not compile, since the code they test is not yet written. Your focus here is on capturing the intent of the component, not on the implementation.
- Start coding the component to the design. Refactor as needed.
- When the tests pass, stop coding.
- Consider other ways the component can break; write tests to confirm and then fix the code.
- Each time a defect is reported, write a test to confirm. Then fix the code.
- Each time you change the code, rerun all tests to make sure you haven’t broken anything.
By writing the test cases before producing the code, you gain clarity of purpose. This system lets you understand exactly what the requirements for that component are because you just captured those requirements in code. You also gain a unique opportunity to explore the requirements. For example, suppose you are asked to create a string parsing utility. Your requirements might specify certain tasks the string parser must perform, but they might not specify what the parser should do with an empty or null string. If you don’t consider this detail while creating the component, a nasty and a difficult-to-trace NullPointerException could result at runtime. By writing the test cases in advance, you will take into account items that could cause the component to fail.
In addition to helping clarify the requirements, your test cases prevent you from overdesigning or complicating your implementation. After all, when the tests run, you simply stop coding. You also gain the freedom to change your classes more confidently. Instead of wishing you could change a particular piece of code and being unsure what effect it would have on the system, you can now make your changes without worry. Your tests will tell you what the impact of your changes is.
Maintenance also benefits from unit tests. It is often easier to figure out a component’s expected use by reading its tests than by reading the object itself. As maintenance developers make changes, they use the unit tests, which give instant feedback. Regression testing doesn’t have to take place immediately before release; you can test continually — every 10 or 15 minutes. You have captured the requirements for your code in the one place guaranteed to live as long as the code — the code itself.
The JUnit framework, written by Erich Gamma and Kent Beck, enables comprehensive unit testing by making it easy — even fun — to write test code. With JUnit, each test case extends the TestCase class. Any public, no-argument method in which the name starts with “test” is executed one at a time. The test methods call the component under test and make one or more assertions about the behavior of that component. JUnit reports the precise location of each failed assertion.
As an example, let’s think about a simple telephone number object. What behavior should it have? At a minimum, it will have accessors for the components of a U.S. number: area code, exchange, number, and extension. We should also have a formatter that gives a nice string representation. Remember, we write the test first.
The following idiom starts a test case that can run by itself or be incorporated into a larger suite of tests:
import junit.framework.*;
public class TelephoneNumberTests extends TestCase {
   public static void main(String[] args) {
      junit.textui.TestRunner.run(suite());
   }
   public static TestSuite suite() {
      return new TestSuite(TelephoneNumberTests.class);
   }
}
This test will execute. Since there are no test methods, it reports an error. What do we need to add for test methods? The rule of thumb is: If it can possibly fail, write a test for it. There are some exceptions to this rule, however. For example, since simple accessor methods rarely fail, they rarely are tested. Of course, if your accessor does more than just set an instance variable, you should write a test for it. Choosing precisely what to test takes some practice.
Here is a test method for the string formatting:
   public void testSimpleStringFormatting() throws Exception {
      // Build a complete phone number
      TelephoneNumber number = new TelephoneNumber("612", "630", "1063",
"1623");
      assertEquals("Bad string", "(612) 630-1063 x1623",
number.formatNumber());
   }
The assertEquals() method takes a message string, the expected value, and the actual value. Internally, if expected.equals(actual) returns false, the assertion fails.
This method verifies the basic case, but we can think of many ways for string formatting to fail. What happens if any or all of the parts are null? toString() must do something reasonable. Let’s say the area code and extension are optional, but the exchange and number must be present or a NullPointerException will be thrown. Notice that we are defining the contract of the TelephoneNumber object well before writing the object itself. We are focused on its expected behavior, not on what is easiest to implement.
Here are the new test methods:
   public void testNullAreaCode() throws Exception {
      // Build a phone number without area code
      TelephoneNumber number = new TelephoneNumber(null, "630", "1063",
"1623");
      assertEquals("Bad string", "630-1063 x1623", number.toString());
   }
   public void testNullExtension() throws Exception {
      // Build a phone number without an extension
      TelephoneNumber number = new TelephoneNumber("612", "630", "1063", null);
      assertEquals("Bad string", "(612) 630-1063", number.toString());
   }
   public void testNullAreaCodeAndExtension() throws Exception {
      // Build a phone number without area code or extension
      TelephoneNumber number = new TelephoneNumber(null, "630", "1063", null);
      assertEquals("Bad string", "630-1063", number.toString());
   }
   public void testNullExchange() throws Exception {
      // Build a phone number without exchange
      TelephoneNumber number = new TelephoneNumber("612", null, "1063",
"1623");
      try {
         number.toString();
         assert("Should have thrown a NullPointerException", false);
      } catch(NullPointerException npe) {
         // expected behavior
      }
   }
(You can find the complete code for TelephoneNumberTests.java by downloading jw-0526-testinfect.zip in Resources.)
These tests define the behavior of the TelephoneNumber. You can probably come up with more ways to break the object, as it’s pretty loosely defined right now. You can also see that implementing the TelephoneNumber object will be somewhat mechanical once it’s specified by the tests.
The problem with unit testing EJBs
Now that you are sold on the benefits of unit testing, you must be warned about one problem: Unit tests run best when they run individually, in isolation, and quickly. A test case typically constructs the objects it is testing, as shown in the example above. However, sometimes the object being tested is dependent on the behavior of other objects. In such situations, the test case also builds a test harness to “stub out” the needed behavior. Such a test harness has the same interface as the real system, but doesn’t actually do anything. For example, a test case for a robot arm might provide objects that behave like a motor and a position sensor. These would fool the unit being tested into thinking it was calling the real robot arm, even though nothing is moving. Although this works well for most standalone applications, it becomes outrageously complicated when you test code — like an EJB — that runs in an application server.
Indeed, EJBs are different. They are not meant to be constructed directly by their callers. They usually rely on context provided by their container, and without that context, most EJBs will not function. Although, conceivably, a test case could construct a convincing test harness, most likely the harness would be as complicated as the application server itself. In addition, you would have to test the test harness. And, since you’ve just built an application server, you might as well deploy your application on it. Otherwise, the testing and deployment environments would be different.
This problem also exists for other types of objects. Testing an RMI object, servlet, or any other component that gains context from its application server is just as difficult. If testing the object outside its native environment is even possible, the validity of the test might be compromised. Unit testing on the application server can be used for any of these cantankerous components.
Unit test cases on the application server
At this point you should understand the challenges of testing EJBs. We know unit tests run best when they run individually, in isolation, and quickly, but we also know that the objects we want to test lose valuable context without the application server. The answer to this challenge is to test each component individually, but to retain the context of the application server. This achieves the goals of unit testing, since we will have confidence that each component functions as designed. In addition, we will have a realistic test of the object in the appropriate context.
To unit test, the test cases must execute in the context of the application server. Since this white-box testing cannot be accomplished by a client connected from outside the application server, another mechanism is required. A servlet interface running tests seems to fit the bill, as all current application servers support servlets. The servlet interface executes within the application server, so all components will contain their context. The source code for the servlet interface is in TestRunner.java. (See Resources.)
TestRunner accepts HTTP GET requests with a parameter classname that identifies the test case class to run. In the same way that the command line interface does, the named class must either extend TestCase, or it must have a public, static method called suite() that returns a TestSuite. The servlet interface executes the tests in the test suite and reports its results as an HTML response to the HTTP GET request.
TestRunner uses the Class.forName() method to load the test case class. Therefore, the test cases must be present in the application server’s classpath. In addition, TestRunner uses reflection to locate the suite() method, so it must be public.
An EJB test case
We will now revisit the telephone number class. The sources in example2 in Resources define a telephone number as a session bean. Since an EJB cannot be created directly by clients, we must modify the test case to match.
The first change you will notice is that the individual test methods no longer directly construct instances of the class under test. Instead, they call the createTelephoneNumber() method. (Of course, factoring object construction into a factory method is generally a good idea, anyway.)
Here is createTelephoneNumber():
   protected TelephoneNumber createTelephoneNumber(String areaCode, String
prefix, String number, String extension) throws RemoteException,
CreateException {
      return home.create(areaCode, prefix, number, extension);
   }
This method asks the EJBHome to create an instance of the telephone number session bean. Of course, before this can work, home must be assigned a value. This occurs in the test case’s setUp() method. The JUnit framework calls setUp() on each new instance of the test case class before executing a test method. Each test method executes in its own new object to ensure it is isolated from every other test method.
For this test, the setUp() method has one responsibility: to locate the EJBHome interface for the telephone number EJB. Like any other EJB client, TelephoneNumberTests uses JNDI to find a reference to the home interface, as shown below:
   private TelephoneNumberHome home;
   public void setUp() throws Exception {
     Context initial = new InitialContext();
     Object objRef = initial.lookup("TelephoneNumber");
     home = (TelephoneNumberHome)PortableRemoteObject.narrow(objRef,
TelephoneNumberHome.class);
   }
The application server itself provides the JNDI InitialContext. This namespace is available only to components executing in the application server; therefore, this test case can run only in that context. In the root of this namespace you can find the EJBs known to the server. That means, of course, that the TelephoneNumber component must be identified to the application server. We’ll take care of that later when we deploy the EJB.
Create the TestRunner J2EE component
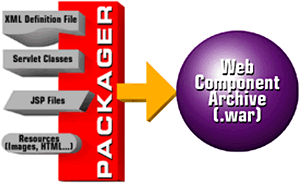
At this point, you could deploy this servlet into virtually any application server available today. For best results, you should package this servlet as a Web component. A Web component is a specialized jar file that contains the class files and component definitions required to distribute servlets and JSPs. In this situation, the Web component will contain the JUnit framework and the TestRunner servlet. The actual EJB and test case will go into a separate package specifically for the bean. The J2EE SDK includes a tool called packager that creates the Web component archive (.war) file. packager assembles the class files, JSP files, XML deployment descriptor, and any other resources (such as HTML files or graphics) into the archive.

The easiest way to start a Web component is with the J2EE deployment tool. deploytool features a wizard that will create a Web component archive based on your input. Unfortunately, it immediately puts the .war file into an application archive (.ear) file. You can use jar to extract the .war file from the .ear file. Next, use jar to extract the web.xml file from the .war file. The definition file informs the application server what servlets and JSPs should be exposed, the base URI for the component, and what security restrictions should be placed on the component. The specification file that accompanies this article defines and exposes one servlet: TestRunner.
While the deployment tool is a great way to get started, if you want to distribute the Web component independently of the entire application, you will need to use packager to create .war files independently of deploytool. A simple batch script can build the archive file for you.
Create the TelephoneNumber EJB
Now it’s time to create the EJB package. As with the Web component, the easiest way to begin is with the deploytool. After you use deploytool to create the EJB, extract it from the application archive and pull out the XML specification file. You can then use that deployment descriptor in a batch file that will package the bean.
Deploy the J2EE components
After using the packager to create the Web component and the EJB, you can implement deploytool to bundle and deploy the components. deploytool builds J2EE applications out of their constituent parts. An application assembler combines all of the EJBs and Web components that make up the application. In addition, the assembler adds any supporting libraries to the package. Before deploying the application, the assembler also has an opportunity to set environment parameters, security roles and restrictions, and transactional dynamics. Once the package is complete, the application assembler deploys the application to a running J2EE server.

Bear in mind that the SDK provided by Sun serves as a reference implementation of the J2EE specification. The packaging and deployment of J2EE applications may vary widely across different vendors’ implementations. The specification explicitly allows for vendor differentiation in their tool sets.
Let’s walk through the steps of deploying the JUnit servlet and the TelephoneNumberTests test case. This example uses the code and directory structure from in Resources.
- Download and install the J2EE SDK.
- Download and install
testinfect.zip - Compile the JUnit code by running
compile.bat. - Create the Web component by running
package.bat. - Start
deploytooland create a new application. - Add
telephone.jarto the application as an EJB. - Add
junit.warto the application as a Web component. - Run
j2ee -verbosefrom a command line. - Identify the Context Root. Use JUnit. (This string will be the leading part of the servlet’s URL.)
- Identify the EJB’s JNDI name. Use
TelephoneNumber. (This must match the name used in the test case code.) - Tell
deploytoolto deploy the application you have just built to localhost. Do not bother with the client jar.
Now, JUnit is deployed. To verify this, point your Web browser to You should see a form that asks you for the name of the test suite class. Enter example2.TelephoneNumberTests here and choose “Submit Query.” Congratulations, four out of the five tests failed! Let the debugging begin!