Your iPhone has a neat trick up its sleeves that gives you total control over the focal plane in all the portraits you’ve already snapped. This gives you the power to significantly enhance the composition and emotional impact of each image. In some cases, you can even focus on new subjects in regular stills and Live Photos.
Since iOS 17, you no longer need to worry about manually refocusing an image in the Camera app before you actually take it. Your iPhone’s image signal processor (ISP) records enough depth data in photos now that you can simply refocus the photograph in the Photos editor. By changing the depth of field after the fact, you have control over which planes are blurred and what appears sharp and in focus.
While portrait refocusing is available on iOS 17 and later, as well as on iPadOS 17 and macOS 14 Sonoma and later, you can change the selective focus point in any portrait taken with an iPhone 13 or newer running at least iOS 16. Refocusing works on portraits taken with the rear camera, including Night mode portraits, and even in selfies taken in Portrait mode on the front camera.
- On devices running iOS 17, iPadOS 17, or macOS 14 Sonoma and later.
- In portraits taken on an iPhone 13 or newer running iOS 16 or later.
- For portraits taken with the rear camera, including Night mode portraits.
- In selfies taken in Portrait mode on the front camera.
- In some pictures taken in Photo mode (see below).
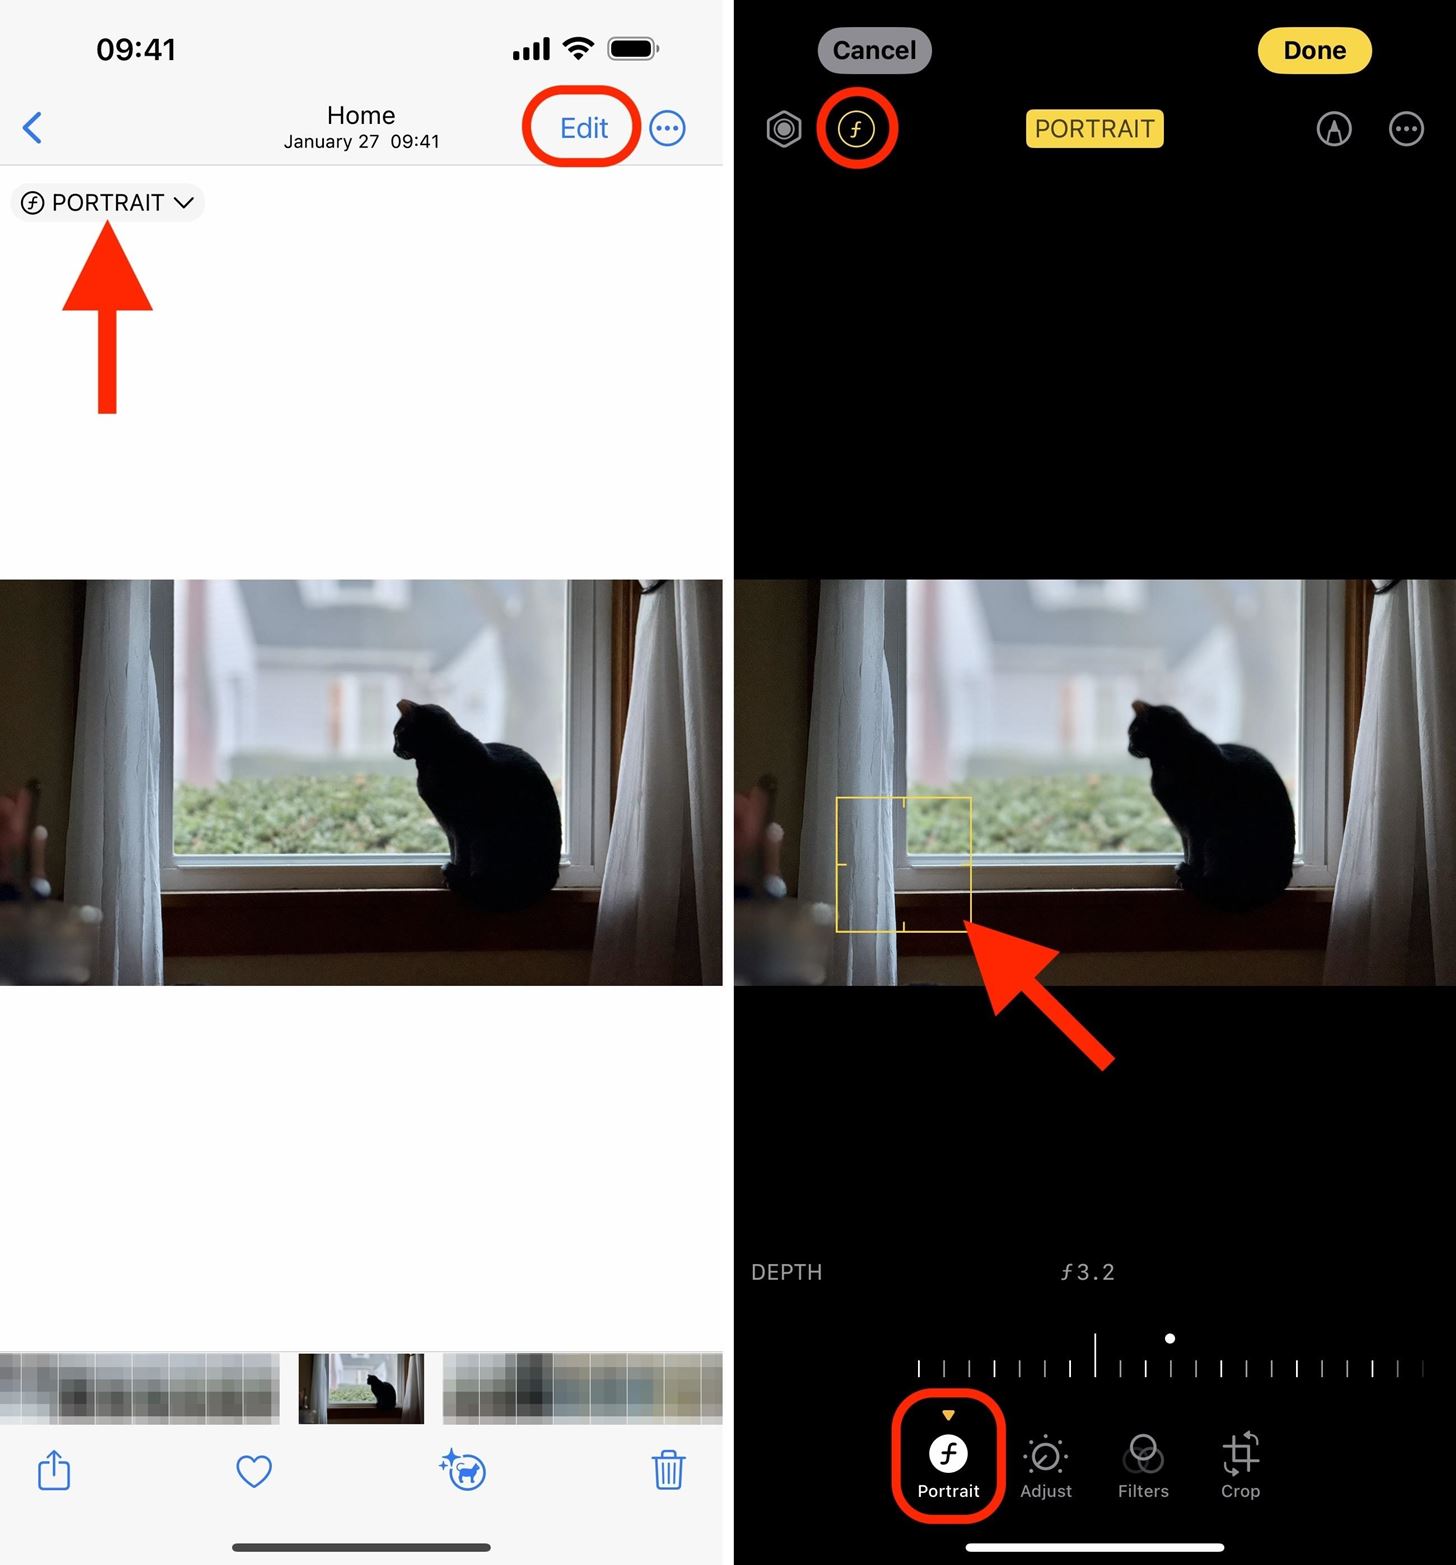
Open the Photos app on your iPhone or iPad, find a photograph taken in Portrait mode, and tap it to view it in full screen. In the full-screen viewer, portraits are labeled “Portrait” in the corner. Next, hit “Edit” to open the editor.
The editor should open up the “Portrait” tab with the ƒ-stop icon highlighted, where you can drag the Depth Control slider to increase or decrease the level of background blur in the foreground, middle ground, and/or background. If the portrait can be refocused, you’ll also see a yellow square on the image where the focus point is currently set.

To change the portrait’s subject, tap the new area you want to focus on. If the shot was taken with a Pro or Pro Max model, you may notice better focusing abilities because of additional depth data from the lidar sensor. Make any other changes needed to the photo, then tap “Done” to save.

The process is similar when editing portraits in your Mac’s Photos app. Find a portrait, double-click to open it, and click “Edit.” It should open to the “Adjust” tab, where you can click different areas of the image to adjust the focus point. Make any other changes needed, then click “Done” to save.

If you have an iPhone 15, 15 Plus, 15 Pro, or 15 Pro Max and have Portraits in Photo Mode enabled in the Camera settings, regular stills or Live Photos taken in Photo mode will record depth data in case you want to turn the image into a portrait later to refocus it. Apple says it will only capture depth information if Camera detects a person, dog, or cat in the frame, but in our experience, it’s not that limiting.
In the full-screen view in the Photos app, you’ll see the ƒ-stop icon in the corner alongside any other identifier like “Live.” You can select the icon to open the menu where you can turn “Portrait” on for the image, but you can also do that in the editor. Tap “Edit,” switch to the “Portrait” tab, drag the Depth Control slider from “Off” to any aperture, and then choose a new focus point. Select “Done” to save.

Don’t Miss: Instantly Crop Photos and Videos on Your iPhone Using iOS 17’s Hidden Quick-Cropping Tool
Just updated your iPhone? You’ll find new features for TV, Messages, News, and Shortcuts, as well as important bug fixes and security patches. Find out what’s new and changed on your iPhone with the iOS 17.6 update.
Cover photo, screenshots, and GIFs by Justin Meyers/Gadget Hacks


