I got to know about spinning down drives after stopping in Vista & Windows 7 while I was reviewing the changelog for USB Safely Remove 4.4. Basically what USB Safely Remove explained in their blog about this is when you eject a device, for instance a USB flash drive in Windows XP, the LED will be switched off. However in Windows Vista and Windows 7, the LED light is still turned on even after ejecting them from Safely Remove Hardware. It won’t be a problem if it is a USB flash drive because it doesn’t have any moving parts but it could be worrying when it comes to an external mechanical hard drive that requires the heads to park to avoid damaging the hard drive which will lead to data losses.
Starting from USB Safely Remove 4.4, it comes with a feature to power off device after device stopping by just enabling it in the Options. For people that managed to grab a free license of the USB Safely Remove 4.7 which I’ve posted it yesterday, I bet you would have enabled this option during the first run of the software for safety precaution. However for people that missed the giveaway, or would want to use this option WITHOUT installing USB Safely Remove software, here is how you can manually enable this safety feature.
The powering off USB port when safely removed USB device feature in Windows Vista or Windows 7 does not rely on USB Safely Remove as it can be enabled from a registry value. I got to know about this by turning the option on then off while tracking the registry and file changes. In fact this is even documented in Microsoft Knowledge Base (KB) article ID 2401954.
Here are the steps to enable powering off USB port after it has been safely removed.
1. Click Start, click Run, type regedit in the Open box, and then click OK.
2. Locate and then click the following subkey in the registry:
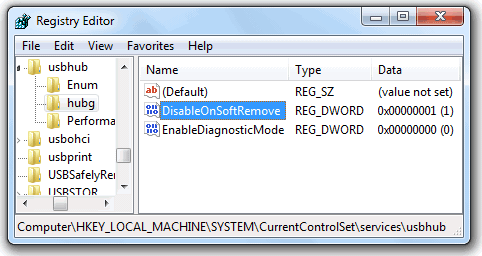
HKEY_LOCAL_MACHINE\SYSTEM\CurrentControlSet\Services\usbhub
3. On the Edit menu, point to New, and then click Key.
4. Type HubG for the name of the new key, and then press ENTER.
5. On the Edit menu, point to New, and then click DWORD (32-bit) Value.
6. Type DisableOnSoftRemove for the name of the DWORD Value, and then press ENTER.
7. Right-click DisableOnSoftRemove, and then click Modify.
8. In the Value data box, type 1, and then click OK.
9. Exit Registry Editor and restart your computer for the change to take effect.

If the 9 steps above are too confusing, you can just download this registry file and run it which will automatically merge it into your Windows registry.
Although this is documented in Microsoft KB but it is stated as “FAST PUBLISH” article. I enabled the DisableOnSoftRemove value on my test computer and rebooted it. Then I tried connecting an external Maxtor hard drive, disabled it through Windows 7 Safely Remove Hardware but the LED light is still lit up which is supposed to be turned off according to the USB Safely Remove software blog…
To test this further, I’ve installed a USB packet sniffer software called HHD Software Device Monitoring Studio 6.22 and it didn’t find any packets being sent/received to the external Maxtor hard drive after ejecting the external hard drive from Safely Remove Hardware. No matter what, I will have this option enabled on my Windows 7 system just to be on the safe side. Also, check the best USB monitor tools.


