I’m a sucker for a cool space wallpaper, and judging by the images I find online, so are many of you. Creating a cool space scene can be done in a few minutes once you’ve got the basic method down, and Gimp provides several ways to go about adding random elements to keep things interesting. In this guide we’ll cover a 10 minute method to creating a galactic landscape that may not win you any awards but will certainly add some depth to your desktop.
If you do not already have Gimp (available by default in current Ubuntu versions) it’s freely available for download here for Windows, Linux, and Mac. This tutorial will be using Gimp 2.6.7.
Creating the Stars
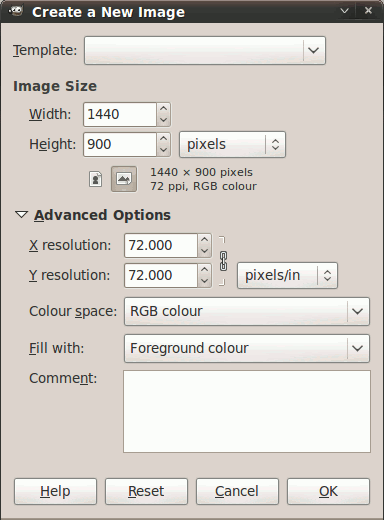
We will, of course, want to start with a layer of stars. With Gimp open, go to File -> New. At the minimum, you will want your image size to be your desktop resolution, such as 1024×768 or 1440×900. Under Advanced Options, choose Fill With: Foreground Color (black).

Now it’s time to create our stars. On the canvas window, go to Filters -> Noise -> Hurl. Select Randomize and click OK.

To remove color from the stars simply click Colors -> Desaturate -> OK. We can always add in color later if desired.
To thin out the dots, set your image zoom to 100%, then choose Colors -> Levels. In the first text box, enter a number from from about 220 to 240 to get a medium density star field.

To improve the stars’ appearance, click Filters -> Light and Shadow -> Sparkle. Set Flare Intensity to somewhere between .10 and .15 for a fairly subtle sparkle effect.

Save and minimize the star field canvas for now, because we’ll be creating a new image for the planet.
Creating a Planet
First we’ll want a good looking high-resolution texture. Since we’ll be warping the texture with a lens to make it look better on a sphere, it’s very important you find a large, high resolution image even for a small planet. You can find many such images here.
Open your new texture in Gimp and use the Crop tool to make it an even square shape. Just click the Crop tool (Shift+C) and drag a square box around the area you want to keep.

To make it look properly spherical, click Filters -> Light And Shadow -> Apply Lens. Choose Set Surroundings to Background Color and click OK.

Some image types may leave a white background like in the example above. To remove the white space, first right-click your planet layer and choose Add Alpha Channel. Then pick the Fuzzy Select tool (or hit U on the keyboard), click any white space, and hit the delete key.
For our shadow, create a new layer above the planet, and choose the Ellipse Tool (or hit E on the keyboard). Drag a box from one corner of your image to the other, creating a circle roughly the same size as the planet. Use the bucket tool to fill this selection in with solid black.

Click Layer -> Scale Layer and increase the shadow layer to about 150% of its current size.
Next, click Filters -> Blur -> Gaussian Blur. I’m using a 2000×2000 texture, so with my image the blur had to be set to 500 to achieve the desired effect.
To drag our big black blurry shadow in to place, click the Move tool (or hit M) and drag the shadow wherever it looks good.

Now save your planet image as planet.png. Make sure you do not use JPG as it will not properly handle the transparency.
Now we’re ready to combine our images. Back in the star field canvas from the first section, choose File > Open as Layer and pick your planet file. It will be big, so shrink it down with the Scale tool (Shift+T) to the size you like and place with the Move tool.

Adding Nebulas
For a nebula effect, start by creating a new transparent “nebula” layer. Now pick Filters -> Render -> Clouds -> Plasma. Select Randomize and hit OK.

Colors can be adjusted by opening Colors -> Color Balance.
To make it look a little smoother, choose Filters -> Blur -> Motion Blur and set to an appropriate level for a smooth, cloudish look, probably at least 20.

Now just set the opacity on your nebula layer to the level you like from the Layers window..

To top off our image, we’ll use Gimp’s Supernova filter. First create a new transparent layer called nova. Then click Filters -> Light and Shadow -> Supernova. Set color, size, and placement options as desired and click OK.

And now we’ve got a passable space scene created in just a few minutes. If you’d like to improve on it further, I’d suggest using a similar method to our shadow creation to create a atmospheric “halo” around the planet, setting up layer masks to get finer control over the nebula, and adjusting color saturations for a more cohesive look. This basic method can be expanded dozens of ways to create space scenes of all types.


