Alternative deployment methods, Part 3: The code
Examine the code and techniques used in an alternative deployment tool
In the first two parts of this series, I described the shortcomings of most popular methods of deploying Java applications, and proposed a solution that tackles many of those disadvantages. This month, I turn to the nuts and bolts of implementing the solution. I also consider the snags you may encounter when designing and implementing similar applications. And in the sidebar Commercial deployment products, I add to my discussion on new products that ease the deployment process. Let’s begin with a review.
Alternative deployment methods: Read the whole series!
- Part 1 — Beyond applets
- Part 2 — The best of both worlds
- Part 3 — The code
Review
Deployment is an important part of the software-development life cycle. After all, software must reach the end user to be of value. Two traditional deployment models are the “foot-and-hand” model (someone runs around on foot and installs the software by hand) and the “self-service” model (the user installs the software himself). For large deployments, both models are time-consuming and expensive. Therefore, for many managers and software developers, the Web browser and the Java applet provide a promising alternative.
Java applets have many advantages over traditional deployment methods. Primarily, they leverage the ubiquity of the browser and the network. However, applets suffer from deficiencies that arise from their original design, from the browser’s document-centric presentation model, and from implementation differences between browsers.
Last month, I proposed an alternative that implements the applet’s best features and works around its weaknesses. This deployment technique offers rewards similar to those of more traditional alternatives.
General design
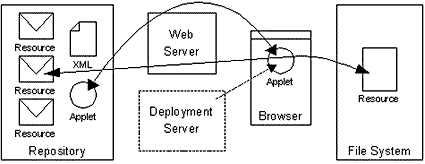
Figure 1 illustrates the tool’s basic design:

The repository holds deployable resources (code, source, documentation, etc.). Physically, it is part of the server-side file system. The Web server delivers resources from the repository, in addition to typical Web fare such as Webpages and images. During the first phase of the deployment process, the Web server delivers a small bootstrap applet to the browser. This applet subsequently downloads and installs the deployable resources from the repository to the user’s filesystem. The deployment server, an optional component, reduces the applet’s workload, therefore reducing its size and complexity.
My goal was to build a deployment tool that was simple, embodied good practice, and was component-based (modular and pluggable).
Class model
The deployment tool’s class model is much too large for one diagram. To make it easier to digest, I’ve made three smaller diagrams of the critical classes, which I discuss in the following sections. The diagrams cover aspects of the overall model: the XML-related classes, the director classes, and the agent classes.
The XML classes
Deployment begins when the deployment instructions file, an XML document that describes the deployment, is processed. I explained the file’s structure and contents last month. (See Resources for a link.)
Processing occurs in two phases; the first involves parsing the XML, validating its structure, and capturing and storing critical information. The DeploymentInstructionsParser class and the Node class and its subclasses handle this phase. Figure 2 illustrates their relationship.

The DeploymentInstructionsParser class drives the deployment. DeploymentInstructionsParser parses the XML with a SAX parser and works in tandem with Node and its subclasses to validate the document structure. Each subclass of Node handles one of the XML document’s element types. For example, the NodeRule class validates and extracts information from the rule element type.
During the second phase of processing, the deployment tool builds an in-memory model of the XML document, optimized for speed and resource usage. I could have used the Document Object Model (DOM), but designed my own classes instead, for two reasons. First, DOM is general in scope and thus must be prepared to handle all valid XML. This universality hurts DOM in terms of size and performance. Second, DOM models an XML document through broad entities called nodes, rather than as business-level entities like rules or steps.
Figure 3 shows the relationship between these business-level classes.

Each class corresponds to a tag in the XML deployment instructions document. For example, the Rule class corresponds to the rule element type. An instance of the Rule class corresponds to a rule element in the XML document. It contains the information from the XML document as well as direct references to parts of a rule like requirements, sets, and steps.
The Director and Agent classes
Once an XML deployment instructions file has been parsed and converted to business-level objects, the deployment tool is activated. Two complementary sets of classes carry out the deployment process: Director orchestrates deployment and Agent completes the actual work.
Figure 4 illustrates the relationship between the Director classes and the Agent classes.

The Director interface comes in two flavors: the LocalDirector class and the RemoteDirector class. RemoteDirector is the client side of the deployment server described in Figure 1.
Think back to Part 2 of this series; the full implementation of the deployment tool, which sports an XML parser, SAX implementation, and business logic and infrastructure, easily tips the download scale at more than 1 MB. In order to reduce download time and memory requirements on the client side, I designed the tool to easily separate into two parts: a heavier server-side piece that doesn’t need to be downloaded and a lighter client-side component weighing in under 50 KB. I traded overall applet size for network communication between client and server. The code, in either case, is almost identical; another win for modularity.
All Director objects implement a direct() method, which initiates the deployment. It takes one parameter — an Agent object.
All Agent objects implement the method performAction(). A Director calls this method to instruct the Agent to perform deployment-related actions like querying the user or installing a file.
One of my design goals was to make this tool modular and pluggable, which enhances a library’s usability by making it easier to extend and customize. This design doesn’t dictate a particular interface style. Concrete implementations of the Agent class must plug in an interface.
The code, which can be downloaded from Resources, includes — by popular demand — a simple, graphical, wizard-like interface.
Operation
Let’s look at the operation of the deployment tool from two perspectives. From the Director side, we see the selection of rules to execute and step implementation within those rules. From the interface side, we see the flow of control and information from Director to Agent and back.
General overview of rule execution
Figure 3 demonstrates the relationship between the deployment instructions’ fundamental components. In brief, the topmost component is the ruleset, which comprises one or more rules. A rule comprises one or more steps and must satisfy certain requirements before the steps can be taken. The requirements are themselves rules.
A ruleset forms a tree-like data structure. The rules are the nodes; the requirements are the edges that join the nodes. When performing deployment, the tree is traversed, starting from its root. The steps associated with a rule are performed when all of a node’s outgoing edges have been traversed successfully.
Consider the following example deployment instructions file:
<?xml version="1.0"
encoding="UTF-8"?>
  <ruleset>
    <rule name=".">
      <requires name="accept_license"/>
      <requires condition="license_choice=accept"
name="select_path"/>
    </rule>
    <rule name="accept_license">
      <step type="license">
        <in>
  This software is Copyright (c) 2000, Todd Sundsted.
  Use of this software implies agreement with the terms
  of this license.  Yada, yada, yada...
        </in>
        <out name="license_choice"/>
      </step>
    </rule>
    <rule name="select_path">
      <step type="locate">
        <in>Locate Directory</in>
        <inout name="path"></inout>
      </step>
    </rule>
  </ruleset>
The <ruleset> in the example above contains three rules. The rule named ".", always the first to be evaluated, is the root of the tree described above. The steps in "." won’t be processed until the rules "accept_license" and "select_path" are processed first. Since neither requires other rules, their steps execute immediately and in sequence. If both succeed, the steps in "." execute.
Flow of control and information between director and agent
The interface between the director and the agent is tricky because it can be either completely local (within one Java VM) or distributed (across two Java VMs), depending on whether the applet instantiates the LocalDirector class or the RemoteDirector class. Generally, a step in a rule causes the agent to perform an action. The agent is free to implement actions, as well as the mapping between step types and action, in any manner.
A step is rendered in this general form:
  <step
 type=[type name]>
[parameter]
    .
    .
    .
</step>
A step’s type indicates what action the agent completes. A step can have zero or more parameters that exchange data with the step. Parameters come in three flavors:
- In: used to pass data to the step
- Out: used to receive data from the step
- Inout: used to pass data to and receive data from the step
This arrangement should look familiar if you’ve used CORBA before.
Consider the following step:
  <step
 type="license">
<in>
This software is Copyright (c) 2000, Todd Sundsted.
Use of this software implies agreement with the terms
of this license.  Yada, yada, yada...
</in>
<out name="license_choice"/>
</step>
This step is named "accept_license" and has two parameters. The first, an in parameter, contains the text of the license agreement. The second, an out parameter, contains the user’s response to the license agreement. A variable called "license_choice" stores this parameter. Other steps can access this variable.
When an instance of the LocalDirector class is used as a director, the parameters are placed in an array, and the array is passed from the director to the agent. The agent implements and modifies the array’s contents. When the method call returns, the director will have access to the changes made by the agent.
When an instance of the RemoteDirector class is used as a director, the parameters are put in an array that is serialized and passed across the RMI connection. This serialization affects a pass-by copy of the entire array. The agent can still implement and modify the array’s contents, but the director cannot see the changes without some extra work.
Here is some typical agent code:
  public
void
performAction(String stringName, Object [] rgobjectParameters) {
.
.
rgobjectParameters[0] = "...";
.
}
The modification of the array’s contents will not work when RMI is involved. I introduced the nonpublic AgentProxy class, which works behind the scenes to overcome this problem. Its performAction() method wraps the call to an agent’s performAction() method and returns the modified array of objects. It looks like this:
public Object []
performAction(String stringName, Object [] rgobjectParameters) {
  .
  .
  agent.performAction(stringName, rgobjectParameters);
  .
  .
  return rgobjectParameters;
}
The RemoteDirector instance reads the modified values from the returned array, rather than the parameter array. The client never notices a difference.
Conclusion
You should now have an understanding of the benefits and limitations of applets and other traditional deployment methods, as well as a promising alternative. Based on the nearly simultaneous arrival of many similar solutions, I think it’s safe to say that these new techniques will play an ever-increasing role in Java application deployment.


