Clean up your wire protocol with SOAP, Part 2
Use Apache SOAP to create SOAP-based applications
SOAP (Simple Object Access Protocol) is a wire protocol that uses XML for data encoding. It is a minimalist specification of sorts; it only defines the most critical pieces required by a wire protocol, and purposefully omits the details of garbage collection, object activation, and so forth.
SOAP is especially important for Java developers because it adds to Java’s value proposition by making platform independence and portability more interoperable. In fact, I would not be surprised if future releases of Java 2 Platform, Enterprise Edition (J2EE) make SOAP one of the mandatory wire protocols that all J2EE-compliant application servers must support. But that’s enough speculation for now.
In Part 2 of this four-part series, I will introduce you to Apache’s SOAP implementation.
Read the whole series on SOAP:
- Part 1: An introduction to SOAP basics
- Part 2: Use Apache SOAP to create SOAP-based applications
- Part 3: Create SOAP services in Apache SOAP with JavaScript
- Part 4: Dynamic proxies make Apache SOAP client development easy
Introducing Apache SOAP
Apache SOAP, the Apache Software Foundation’s implementation of the SOAP specification, is based on IBM’s SOAP4J. Like all Apache projects, Apache SOAP is open source and available under the Apache license. I think it is currently one of the best implementations of SOAP. Though Apache SOAP conforms to version 1.1 of the SOAP specification, it lacks support for some features included in SOAP 1.1. (See Resources for a list of Apache SOAP’S available features.)
Download and install Apache SOAP
As I mentioned above, you can download Apache SOAP free of charge. (See Resources for a link.) For my Windows NT laptop, I downloaded the file soap-bin-2.0.zip, which contains Apache SOAP 2.0, the latest version as of this writing. Installing Apache SOAP is a breeze. It consists of three easy steps:
- Unzip the downloaded zip file: This results in the creation of a
soap-2_0subdirectory. I unzipped the contents into the root directory of my E drive, so I now have a directoryE:soap-2_0that contains Apache SOAP. - Set up your Web environment: You will need a Web server that supports servlets and JavaServer Pages (JSPs). At this point, you will fall into one the following two categories:
-
- Category 1: You already have a Web server that supports servlets and JSPs, and you feel comfortable configuring it. In this case, set up your Web server so that you can point your browser to The browser will access the
index.htmlfile in the directorysoap-2_0 webappssoap. -
Category 2: You don’t have a Web server that supports servlets and JSPs, or you have one but don’t want to fool around with it. In this case, I suggest downloading the latest version of Tomcat (3.1 at the time of this writing). (See Resources for a link.) Tomcat is yet another example of the excellent software that Apache creates and makes available for free to the software development community. Once you’ve downloaded the appropriate zip file (
jakarta-tomcat-3.1.1.zip), unzip it. Ajakarta-tomcatsubdirectory will be created. Once again, I’ve unzipped the contents into the root directory of my E drive. Add a new context to thejakarta-tomcatconfserver.xmlconfiguration file like this:<Context path="/apache-soap" docBase="E:/soap-2_0/webapps/soap" debug="1" reloadable="true"> </Context>You will need to replace
E:in thedocBaseattribute of theContextelement with the location of yoursoap-2_0directory. To start Tomcat, execute thestartup.bat(startup.shfor Unix) file. To shut it down, execute theshutdown.bat(shutdown.shfor Unix) file. But wait — don’t start Tomcat just yet.
- Category 1: You already have a Web server that supports servlets and JSPs, and you feel comfortable configuring it. In this case, set up your Web server so that you can point your browser to The browser will access the
-
Set up your Web server classpath: Apache SOAP requires Apache Xerces (Java) version 1.1.2 or higher, which supports the DOM (Document Object Model) level 2 candidate recommendation that provides namespace support. I use version 1.2 of Xerces, available from Apache as
Xerces-J-bin.1.2.0.zip. Unzipping this file will result in the creation of axerces-1_2_0subdirectory. As before, I’ve unzipped the file into the root directory of my E drive. You must configure your Web server to usexerces.jar(which is in thexerces-1_2_0subdirectory) — as opposed to any native library/jar that came with your server — for all XML parsing. For example, Tomcat comes with an XML parser (jakarta-tomcatlibxml.jar) that has the DOM level 1 interfaces. Even if you put thexerces.jarin your classpath, any Java code running in Tomcat will find the wrong interfaces because the shell script/batch file that you use to run Tomcat places your classpath at the end. So you must edittomcat.bat(tomcat.shfor Unix) in thejakarta-tomcatbindirectoryand putxerces.jarat the front of the classpath that the script builds. That is what I did in myjakarta-tomcatbintomcat.batfile:set CLASSPATH=E:xerces-1_2_0xerces.jar;%CLASSPATH%;%cp%If you fall in Step 2’s Category 2, then you must also configure your server to use
xerces.jar.Regardless of which category you fall into, in addition to
xerces.jar, you must also set your Web server’s classpath to usesoap.jarfrom thesoap-2_0libsubdirectory.
Test your installation
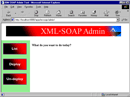
Now, start your Web server and make sure that your installation is correct by pointing your browser to You should see an administration screen as shown in the figure below.

The HelloWorld example
Now that you have set up Apache SOAP, let’s put it to use with a simple HelloWorld application. In SOAP lingo, applications are called services. Typically, services are created in two steps, which may or may not be performed by the same person/organization. The first step is to define and implement the service itself in the language of choice: in this case, Java. The second step is to create clients that actually need and invoke the service. Let’s look at the HelloWorld service first.
The HelloWorld service
The HelloWorld service is the Apache SOAP implementation of the example I discussed in Part 1. The service expects to obtain a person/user’s name and returns a customized hello message to the caller. The code below shows the complete implementation of the HelloWorld service:
package hello;
public class HelloServer
{
   public String sayHelloTo(String name)
   {
      System.out.println("sayHelloTo(String name)");
      return "Hello " + name + ", How are you doing?";
   }
}
Is that all? That is too simple to be true!
Apache SOAP makes creating services extremely easy. Basically, a service consists of the business logic, which is code that you would write regardless of how you made the service available to the rest of the world. In other words, the service is not tainted by any SOAP-related code, because the Apache SOAP infrastructure — which consists of the rpcrouter servlet and soap.jar — handles all the intricacies for you. Let’s talk briefly about those intricacies. Just how does Apache SOAP handle remote procedure call (RPC) requests over HTTP? Understanding that will ease the creation of clients (yes, clients).
The org.apache.soap.rpc package provides support for performing RPC over SOAP in Apache SOAP. The central concept behind Apache SOAP’s RPC support is that of an object ID. All Apache SOAP services must have a unique ID that acts as the service’s object ID. As always, uniqueness is relative; in Apache SOAP, the uniqueness of these object IDs is related to the Apache SOAP server on which a service is deployed. That is, two services deployed on different Apache SOAP servers might have the same object ID.
A client interested in using a service sets up an org.apache.soap.rpc.Call object with the desired service’s object ID, the name of the method to be invoked, and the parameters (if any) for that method. Once the Call object is set up, the client calls its invoke() method, which takes two parameters. The first is a URL to the rpcrouter servlet; in this case, the URL is The second parameter is the SOAPAction header. Refer to Part 1 for a refresher on the importance of the SOAPAction header and its possible values.
The invoke() method converts the Call object into an XML SOAP request (which is similar to the examples in Part 1) and sends that request to the rpcrouter servlet, as indicated by the URL. When the servlet returns a response, the invoke() method returns an org.apache.soap.rpc.Response object, which contains the service response (if any) or the fault (if a fault was generated). HTTP dictates that every request must have a response; so even if the service itself does not return anything, the rpcrouter servlet always does. Hence, the invoke() method will always return a Response object.
On the service side, the Apache SOAP server — that is, the rpcrouter servlet — receives the POSTed SOAP request from the client and rebuilds a Call object. The servlet uses the object ID from the rebuilt Call object to locate the object in the service manager.
The servlet then verifies the method name and invokes it on the located object. The servlet also serializes the return value from this call and sends it back in the HTTP response.
The above discussion raises an interesting question: How does Apache SOAP know how to serialize a given data type? Apache SOAP handles the marshalling and unmarshalling of Java data types to and from XML via a type-mapping registry (org.apache.soap.encoding.SOAPMappingRegistry), and via serialization (org.apache.soap.util.xml.Serializer) and deserialization (org.apache.soap.util.xml.Deserialization) interfaces that all marshallers and unmarshallers, respectively, must implement. Apache SOAP provides a number of built-in marshallers and unmarshallers that implement these interfaces. For example, you can use the org.apache.soap.encoding.soapenc.BeanSerializer class to marshall and unmarshall JavaBeans. I will show you how to use that class later in this article.
Serializers and deserializers for the Java primitive types (int, long, double, etc.) and their objectified forms (Integer, Long, Double, etc.) are preregistered in the type-mapping registry. Therefore, using Java primitives and their objectified forms as method parameters is seamless to a client. However, if a service method requires a parameter that is a JavaBean, it must manually register the BeanSerializer with the type-mapping registry. The service never performs any extra work; the client always ends up doing more. In Part 4 of this series, I will introduce you to a framework built using dynamic proxies, which will make creating clients just as easy as creating services.
Deploy the HelloWorld service
There are two ways to deploy a service in Apache SOAP: use the Web-based administration tool or deploy via the command line. Either choice will deploy your service and make it available to clients.
Use the administration tool
To use the administration tool, point your browser to which should bring up the window shown in Figure 1. Now click on the Deploy button in the left frame. A form with a number of fields should pop up. Not all of the fields are relevant at this time. I will explain the meaning of each field as you use it. Since you will not use all the fields in this article, a few will remain a mystery. But don’t worry; by the end of Part 3, I will cover all the fields.
The ID field is used to set the object ID; as described above, the object ID is used by the SOAP infrastructure to tie an RPC request to a SOAP service. As I mentioned earlier, all Apache SOAP services must have an object ID that is unique among all the deployed services for that server. I generally use the format urn:
You use the Scope field to define the lifetime of the service instance serving the invocation request. Scope may have one of the following values:
- page: The service instance is available until a response is sent back or the request is forwarded to another page — if you use the standard deployment mechanism, request-forwarding is unlikely to happen.
- request: The service instance is available for the duration of the request, regardless of forwarding.
- session: The service instance is available for the entire session.
- application: The same service instance is used to serve all invocations.
It is important to remember that Scope’s value can have important security implications. The page and request values assure the isolation of successive calls. At the other extreme, the application value implies that all users of the SOAP server share the service instance. Astute readers may have noticed that those values are also used by the <jsp:useBean> tag in JSPs. In fact, the rpcrouter servlet was once a JSP page; that’s probably how these values were chosen. For this example, set the scope to application.
Set the Methods field to a white-space-delimited list of method names that can be invoked on the service that is being deployed. Your example service only supports one method, sayHelloTo.
Set the Provider Type field to Java. That means the service has been implemented in Java and you need to provide Apache SOAP with the service’s fully qualified class name. Complete this task in the Provider Class field, which should be set to hello.HelloServer. Since the sayHelloTo method is not static, keep the Static field as is — that is, no.
Now scroll down to the bottom of the browser window and click the Deploy button just below the form (not the Deploy button in the left frame). To verify that the service deployed, click the List button in the left frame. One of the services in the list that shows up should be the urn:Hello service.
From the command line
Instead of using the Web-based administration tool for deploying the server, you can use a command-line-based Java class, org.apache.soap.server.ServiceManagerClient, that comes with Apache SOAP. This class takes two mandatory parameters: a URL to the Apache SOAP’s router servlet (rpcrouter) and an action. The action can be one of the following: deploy, undeploy, list, or query. Based on the specified action, an additional parameter may be required. For example, if the action is deploy, you must provide the name of an XML deployment descriptor file that contains all the information required by the Apache SOAP server to successfully deploy the service at the command line, which an XML file specifies. For example, the deployment XML for the HelloWorld service can be specified as follows:
<isd:service xmlns:isd=" id="urn:Hello">
  <isd:provider type="java" scope="Application" methods="sayHelloTo">
    <isd:java class="hello.HelloServer" static="false"/>
  </isd:provider>
</isd:service>
The XML above embodies the same information that you entered in the Web-based administration tool. As an exercise, try mapping the information that you manually entered to the information contained in the XML. To deploy the HelloWorld service from the command line, you could do the following:
java org.apache.soap.server.ServiceManagerClient deploy DeploymentDescriptor.xml
DeploymentDescriptor.xml is the name of the file that contains the deployment XML shown above. To verify that the server has been successfully deployed, try the following:
java org.apache.soap.server.ServiceManagerClient query urn:Hello
You should receive the same XML that is contained in DeploymentDescriptor.xml.
The HelloWorld client
Coding the client program is much more involved than coding the HelloWorld service. That should not surprise you; you already know that the client shoulders the responsibility for (at least) setting up the Call object, which requires a fair amount of work. As a reminder, in Part 4 of this series I will present you with a framework based on the newly introduced dynamic proxy classes in Java 2, version 1.3, which will make creating clients easy and intuitive. But you’ll have to wait for that!
Listing 1 shows the client program in its entirety. Let’s walk through this program step-by-step. The program expects one mandatory parameter: the name of the person to whom it says hello.
Listing 1: Client.java
package hello;
import java.net.URL;
import java.util.Vector;
import org.apache.soap.SOAPException;
import org.apache.soap.Constants;
import org.apache.soap.Fault;
import org.apache.soap.rpc.Call;
import org.apache.soap.rpc.Parameter;
import org.apache.soap.rpc.Response;

public class Client
{
   public static void main(String[] args) throws Exception
   {
      if(args.length == 0)
      {
         System.err.println("Usage: java hello.Client [SOAP-router-URL] <name>");
         System.exit (1);
      }
      try
      {
         URL url = null;
         String name = null;
         if(args.length == 2)
         {
            url = new URL(args[0]);
            name = args[1];
         }
         else
         {
            url = new URL("");
            name = args[0];
         }
         // Build the call.
         Call call = new Call();
         call.setTargetObjectURI("urn:Hello");
         call.setMethodName("sayHelloTo");
         call.setEncodingStyleURI(Constants.NS_URI_SOAP_ENC);
         Vector params = new Vector();
         params.addElement(new Parameter("name", String.class, name, null));
         call.setParams(params);
         // Invoke the call.
         Response resp = null;
         try
         {
            resp = call.invoke(url, "");
         }
         catch( SOAPException e )
         {
            System.err.println("Caught SOAPException (" + e.getFaultCode() + "): " + e.getMessage());
            System.exit(-1);
         }

         // Check the response.
         if( !resp.generatedFault() )
         {
            Parameter ret = resp.getReturnValue();
            Object value = ret.getValue();
            System.out.println(value);
         }
         else
         {
            Fault fault = resp.getFault();
            System.err.println("Generated fault: ");
            System.out.println ("  Fault Code   = " + fault.getFaultCode());
            System.out.println ("  Fault String = " + fault.getFaultString());
         }
      }
      catch(Exception e)
      {
         e.printStackTrace();
      }
   }
}
The client begins by setting up the Call object, which requires the following information:
- The object ID of the service being invoked, which is set via the
setTargetObjectURI()method on theCallobject. Your object ID isurn:Hello. - The name of the method to invoke on the service, which is set via the
setMethodName()method on theCallobject. Your method name issayHelloTo. - The encoding style used to encode the parameters, which is set via the
setEncodingStyleURI()method on theCallobject. You are interested in the standard SOAP encoding style defined by the namespace http://schemas.xmlsoap.org/soap/encoding/. - The parameters for the method call set via the
setParams()method on theCallobject. ThesetParams()method takes a JavaVectoras its parameter. The vector contains all the parameters, with index 0 being the first parameter in the method signature starting from the left, index 1 being the second parameter starting from the left, and so on. Each element in the vector is an instance oforg.apache.soap.rpc.Parameter. TheParameterconstructor takes the parameter’s name, Java type, and value, as well as an optional encoding style. If anullencoding style is provided (as is done here), then theCallobject’s encoding style will be used. Even though each parameter corresponds to a name, that name can be set to anything and is not used by the Apache SOAP server while invoking the method. Therefore, it is absolutely imperative that you maintain the same order of the parameters in the vector and the method signature.
The code snippet below shows how the client creates the Call object:
// Build the call.
Call call = new Call();
call.setTargetObjectURI("urn:Hello");
call.setMethodName("sayHelloTo");
call.setEncodingStyleURI(Constants.NS_URI_SOAP_ENC);
Vector params = new Vector();
params.addElement(new Parameter("name", String.class, name, null));
call.setParams(params);
Now it’s time to actually invoke the method on the remote HelloWorld service. To do so, the client calls the invoke() method on the Call object. This method returns an org.apache.soap.rpc.Response object, as shown below:
// Invoke the call.
Response resp = null;
try
{
   resp = call.invoke(url, "");
}
catch( SOAPException e )
{
   System.err.println("Caught SOAPException (" + e.getFaultCode() + "): " + e.getMessage());
   System.exit(-1);
}
Next, the client checks the
Response
object. If the method invocation results in an error, the
generatedFault()
method returns a true value, and the actual fault is retrieved and displayed:
Fault fault = resp.getFault();
System.err.println("Generated fault: ");
System.out.println ("  Fault Code   = " + fault.getFaultCode());
System.out.println ("  Fault String = " + fault.getFaultString());
If the method invocation succeeds, the returned hello message is retrieved and displayed:
// Check the response.
if( !resp.generatedFault() )
{
   Parameter ret = resp.getReturnValue();
   Object value = ret.getValue();
   System.out.println(value);
}
The HelloWorld example with JavaBeans
As I mentioned earlier, Apache SOAP provides a number of prebuilt serializers and deserializers. These include serializers and deserializers for using Java Vectors, Enumerations, arrays, and JavaBeans as parameters and return values. In this section, I’ll modify the HelloWorld service to use a JavaBean name to pass in the person’s name that receives the hello message.
The HelloWorld service
The complete implementation of the new HelloWorld service is shown below:
package hello;
public class HelloServer
{
   public String sayHelloTo(String name)
   {
      System.out.println("sayHelloTo(String name)");
      return "Hello " + name + ", How are you doing?";
    }
   public String sayHelloTo(Name theName)
   {
      System.out.println("sayHelloTo(Name theName)");
      return "Hello " + theName.getName() + ", How are you doing?";
   }
}
The service is still easy and resembles HelloWorld without the JavaBean, which implies that the brunt of the work will fall on the client. In fact, the only difference between this version of the service and the previous one is the presence of an overloaded sayHelloTo method, which is shown in boldface.
This overloaded method takes a reference to a Name JavaBean whose definition is shown below:
package hello;
public class Name
{
   private String name;
   public String getName()
   {
      return name;
   }
   public void setName(String name)
   {
      this.name = name;
   }
}
Listing 2 shows the complete HelloWorld service.
Listing 2: HelloServer.java
package hello;
public class HelloServer
{
   public String sayHelloTo(String name)
   {
      System.out.println("sayHelloTo(String name)");
      return "Hello " + name + ", How are you doing?";
   }
   public String sayHelloTo(Name theName)
   {
      System.out.println("sayHelloTo(Name theName)");
      return "Hello " + theName.getName() + ", How are you doing?";
   }
}
Deploy the service
Because you need to provide some extra information to the Apache SOAP server for it to deploy a service that uses a JavaBean, deploying the service will be slightly more complicated this time.
Use the administration tool
To deploy this version of the HelloWorld service using the administration tool, follow the same instructions that you did before, but don’t click the Deploy button. Now set the Number of Mappings field to 1; this indicates that you will give information about one mapping, the Name JavaBean. There should be a table just below the Mappings field; you will use the first row of that table. Keep the Encoding Style as SOAP. Set the NameSpace URI field to the object ID: in your case, urn:Hello. Now set the Local Part and Java Type fields to the fully qualified class name of the Name JavaBean, which is hello.Name. Finally, set the Java to XML Serializer and XML to Java Deserializer fields to org.apache.soap.encoding.soapenc.BeanSerializer, which is the class that implements the Serializer and Deserializer interfaces and will be used to serialize and deserialize the Name JavaBean. If you had more JavaBeans (such as an Address Bean), you would enter information about those beans in this table, and you would update the Number of Mappings field to reflect the number of rows used in the table.
From the command line
From the command line, you need only update the XML deployment descriptor file that is passed in as a command line parameter. The updated XML is shown below:
<isd:service xmlns:isd=" id="urn:Hello">
  <isd:provider type="java" scope="Application" methods="sayHelloTo">
    <isd:java class="hello.HelloServer" static="false"/>
  </isd:provider>
  <isd:mappings>
    <isd:map encodingStyle="
             xmlns:x="urn:Hello" qname="x:hello.Name"
             javaType="hello.Name"
             java2XMLClassName="org.apache.soap.encoding.soapenc.BeanSerializer"
             xml2JavaClassName="org.apache.soap.encoding.soapenc.BeanSerializer"/>
  </isd:mappings>
</isd:service>
As before, the XML contains the same information that you provided via the Web-based administration tool.
The HelloWorld client
The client program is more interesting and involved, just as it was in the first example. Instead of going through the entire program, I will focus on the differences between the two versions of the client program. Since one of the parameters — or in this case, the only parameter — to the method call is a JavaBean, you must manually set up a type-mapping registry. Complete this task by creating a new instance of the class org.apache.soap.encoding.SOAPMappingRegistry and calling the mapTypes() method on it. As the name indicates, that method is used to inform the registry of a previously unknown type, like a custom JavaBean. mapTypes() takes the encoding style to be used, the qualified name, the type’s fully qualified class name, and the serializer and deserializer to use, which in your case are standard bean serializers. A qualified name consists of an element’s name, including the namespace it belongs to. In your case, the qualified name of the Name JavaBean is formed by combining the namespace URI (urn:Hello) and the local name (hello.Name). The code snippet below shows that:
// Create the type mapping registry
SOAPMappingRegistry smr = new SOAPMappingRegistry();
BeanSerializer beanSer = new BeanSerializer();
// Map the types.
smr.mapTypes(Constants.NS_URI_SOAP_ENC,
new QName("urn:Hello", "hello.Name"),hello.Name.class, beanSer, beanSer);
Next, the Call object must be told to use this registry instead of the default one. To do that, call the setSOAPMappingRegistry() method on the Call object, as shown below:
call.setSOAPMappingRegistry(smr);
Once you’ve manually set up a type-mapping registry, you need to set up the parameters for the Call object. Complete that task just like before; the only difference is that instead of a String name parameter you now have a JavaBean parameter, as shown below:
// Set the Parameters
Vector params = new Vector();
Name theName = new Name();
theName.setName(name);
params.addElement(new Parameter("name", hello.Name.class, theName, null));
call.setParams(params);
The remainder of the client is the same as before. Listing 3 shows the complete client program:
Listing 3: Client2.java
package hello;
import java.net.URL;
import java.util.Vector;
import org.apache.soap.SOAPException;
import org.apache.soap.Constants;
import org.apache.soap.Fault;
import org.apache.soap.rpc.Call;
import org.apache.soap.rpc.Parameter;
import org.apache.soap.rpc.Response;
import org.apache.soap.encoding.SOAPMappingRegistry;
import org.apache.soap.encoding.soapenc.BeanSerializer;
import org.apache.soap.util.xml.QName;

public class Client2
{
   public static void main(String[] args) throws Exception
   {
      if(args.length == 0)
      {
         System.err.println("Usage: java hello.Client [SOAP-router-URL] ");
         System.exit (1);
      }
      try
      {
         URL url = null;
         String name = null;
         if(args.length == 2)
         {
            url = new URL(args[0]);
            name = args[1];
         }
         else
         {
            url = new URL("");
            name = args[0];
         }
         // Build the call.
         Call call = new Call();
         call.setTargetObjectURI("urn:Hello");
         call.setMethodName("sayHelloTo");
         call.setEncodingStyleURI(Constants.NS_URI_SOAP_ENC);
         // Create the type mapping registry
         SOAPMappingRegistry smr = new SOAPMappingRegistry();
         BeanSerializer beanSer = new BeanSerializer();
         // Map the types.
         smr.mapTypes(Constants.NS_URI_SOAP_ENC,
             new QName("urn:Hello", "hello.Name"),hello.Name.class, beanSer, beanSer);
         // and tell the Call object to use it..
         call.setSOAPMappingRegistry(smr);
         // Set the Parameters
         Vector params = new Vector();
         Name theName = new Name();
         theName.setName(name);
         params.addElement(new Parameter("name", hello.Name.class, theName, null));
         call.setParams(params);
         // Invoke the call.
         Response resp = null;
         try
         {
            resp = call.invoke(url, "");
         }
         catch( SOAPException e )
         {
            System.err.println("Caught SOAPException (" + e.getFaultCode() + "): " + e.getMessage());
            System.exit(-1);
         }

         // Check the response.
         if( !resp.generatedFault() )
         {
            Parameter ret = resp.getReturnValue();
            Object value = ret.getValue();
            System.out.println(value);
         }
         else
         {
            Fault fault = resp.getFault();
            System.err.println("Generated fault: ");
            System.out.println ("  Fault Code   = " + fault.getFaultCode());
            System.out.println ("  Fault String = " + fault.getFaultString());
         }
      }
      catch(Exception e)
      {
         e.printStackTrace();
      }
   }
}
Compile and run the programs
Now that you’ve developed the complete example, it’s time to see it in action. However, you must first compile the service and client Java code.
Create a hello directory and copy Client1.java, Client2.java, and HelloServer.java into it. I have made my hello directory in the samples directory of the Apache SOAP installation (that is, E:soap-2_0samples). To compile the programs, all you need in the classpath is the parent of the hello directory (in my case, E:soap-2_0samples), soap.jar, and xerces.jar. I use the following batch file to compile the programs:
set CLASSPATH=E:soap-2_0samples;E:soap-2_0libsoap.jar;E:xerces-1_2_0xerces.jar
javac -d .. HelloServer.java Client.java Client2.java
Note: Be sure to execute this batch file from the hello directory.
To use the service, in addition to deploying it, you will need to change the Web server’s classpath to ensure that it can find the hello.HelloServer class — for me, that meant adding E:soap-2_0samples to the Web server’s classpath. After making the required change to the classpath, restart the Web server. Now you’re ready to run the client programs. Here’s the batch file that I use to run hello.Client:
set CLASSPATH=E:soap-2_0samples;E:soap-2_0libsoap.jar;E:xerces-1_2_0xerces.jar
java hello.Client Tarak
The classpath is the same as the one used for compiling the programs.
Finally, below you will find the batch file that I use to run hello.Client2:
set CLASSPATH=E:soap-2_0samples;E:soap-2_0libsoap.jar;E:xerces-1_2_0xerces.jar
java hello.Client2 Tarak
Observe the console window of your Web server and see which methods on the HelloWorld service are being called as a result of running the two different clients.
Summary
In this article, I showed you how to create simple SOAP-based services using the Apache SOAP implementation. The other major contender in terms of SOAP implementation is Microsoft. Unfortunately, pure Java developers would have a tough time using Microsoft, since its implementation consists of COM objects. And besides, Apache’s implementation is still very attractive. Read James Snell’s article, “MS SOAP SDK vs IBM SOAP4J: Comparison & Review,” in Resources for more information.
In Part 3, I will introduce you to another way that Apache SOAP allows you to create and implement services: you can use a scripting language such as JavaScript, as opposed to Java. I’ll also introduce you to a cool JavaScript engine called Rhino. So stay tuned!