How handlers work in Web-accessible home automation
Using Sun Labs’ Brazil server as your starting point
Developing consistent, reliable Web applications that interface with such different devices as home networks, home automation systems, and realtime telemetry devices can be vastly simplified by treating devices as URLs. The URL programming interface (UPI) effectively provides a set of URLs for a device that is available to any user capable of performing the HTTP protocol. HTTP has become so universal that computer science students are often given the assignment of creating an HTTP stack.
Using the Java language, Sun Microsystems Laboratories developed a technology with which users can deploy very small HTTP stacks, with a core of less than 100 KB. These small servers can be embedded in devices or used for small tactical application servers that are similar to traditional Web servers. Such minimal servers can be used to provide an integrated presentation and service layer for a device. Because these servers can act as Web servers that answer URL requests, universal access to devices from any Internet node can be achieved.
This article demonstrates how HTTP stacks can be used to deploy interfaces to devices, creating an extranet that contains those devices. The technology discussed in this article was developed at Sun Labs, which has built several prototypes for smart cards, realtime weather stations, and home automation systems that provide authenticated access to any device on the Internet capable of supporting a Java runtime environment directly or via a proxy.
One of the benefits of this architecture is that its different components can easily be used with one another. For example, you can use a smart card to authenticate access to your home by having it interact with your home network and/or environmental systems. What if every device in your home had a URL with some amount of functionality behind it? Or, better yet, what if you could script applications using HTML that allowed you to do things like change the energy management or shut down lights, locally or remotely, using the same interface?
Supporting devices with Web applications will add new utility to the Internet, if the technology is implemented securely. Without security, however, remote home automation will never succeed. Java technology is perfect for this type of application because of its security model and small size.
Architectural overview
Let’s first examine the Sun Labs Brazil server. Features of Brazil include:
- A simple extension API (called a handler) that uses a delegation-based object model.
- Dynamic loading of application functionality and configurations. The handlers that provide application functionality are resolved and loaded at runtime.
- Mechanisms for composing application modules, encouraging code reuse with well-known design patterns. Information specific to an entire application is in one place, and made available to all of the handlers, simplifying server modification and configuration.

Getting started
To use the server as part of your application, you will need to write one or more handlers. A handler is similar to a servlet in Java Web server terminology, but is lighter in weight.
A handler is written by creating a Java class that implements the handler interface. This consists of only two methods, Handler.init(Server, String) and Handler.respond(Request). The first is called once, when the server is initialized, and the other is called upon each HTTP request.
For many applications, the entire functionality of the system can be encapsulated in one or more handlers. In these cases, the program can be started by the supplied Main program by stating the name of your handler class and network port on the command line:
Java sunlabs.brazil.server.Main -port 8080 -handler my_handler_class_name
If your handler can be configured at runtime with different settings or operating parameters, then these settings or parameters can be appended to the command line in the form of name/value pairs:
Java sunlabs.brazil.server.Main -handler my_handler_class_name parameter_1 value_1 parameter_2 value_2 ...
The Main program will put these name/value pairs into the Server.props field of the server object, which is passed as a parameter to the handler’s init method.
Alternately, these command-line parameters can be placed in a properties format file and referenced via the -config flag of the Main program, as in:
  Java sunlabs.brazil.server.Main -config my_config_file
  (contents of my_config_file)
  port=8080
  handler=my_handler_class_name
  parameter_1=value_1
  parameter_2=value_2
For most applications, you’ll want to use multiple handlers, either written specifically for the application or in combination with some of the handlers provided in the sunlabs.brazil.handler package. The Server class utilizes both the Handler.init(Server, String) method and the ChainHandler to allow multiple handlers to work together, define their own configuration parameters, and avoid the confusion of matching various configuration parameters to the right handlers.
The ChainHandler is the default mechanism used to run multiple handlers. It looks for a single configuration parameter, called handlers, that contains a list of tokens, each of which is the name of another handler. For example, the following entry in a config file:
handlers = a b c
specifies that three handlers should run sequentially: first a, then b, followed by c. The use of Java properties provides for indirect naming. The actual handlers referred to by the above tokens would be:
a.class = "some Java class implementing the handler interface"
b.class = same as above but code for handler b
c.class = same as above but code for handler c
Call chains of arbitrary depth can be configured this way. The config file handlers property can even refer to other instances of the ChainHandler, enabling the creation of an arbitrary tree of handlers.
The ChainHandler starts the other handlers by first instantiating them with newInstance() and then by invoking their init method, which is passed the handler’s name. The handler uses its name to get its configuration parameters from Server.props as described below.
Suppose an application uses two handlers, A and B. Handler A uses configuration parameters option and setting. Handler B uses configuration parameters option and other. When handler A and handler B examine the properties, they use their respective assigned names to differentiate configuration parameters that might have the same name. The server that uses these two handlers might have a configuration file that looks like this:
 handler=sunlabs.brazil.server.ChainHandler
 handlers=first second
 first.class=A
 first.option=value
 first.setting=another value
 second.class=B
 second.option=another value
 second.other=none
The first line is interpreted by the server, which is instructed to use the ChainHandler. The ChainHandler looks at the handlers line for the list of tokens that represent each handler it will run (in this case, first and second). The ChainHandler then creates an instance of classes A and B, specified by first.class and second.class entries. The handler A init method is called with first. as its prefix. Handler B is called with second. as its prefix.
When handler A looks for its configuration parameters in Server.props, it looks for first.option and first.setting (not option and setting). Handlers are not required to use their prefix when examining the parameters, and may therefore share properties, such as the default document root property root.
X10 handler overview
First, we’ll construct a handler for an X10 power-line interface that will enable home automation through the Web.
This sample X10 handler is not intended to be complete, although it has been tested and verified to work. Its primary purpose is to touch on many of the issues that commonly arise when providing URL interfaces to devices, including:
- URL processing
- Device control
- Concurrency management
- Interaction with applets
- Interfacing with HTML
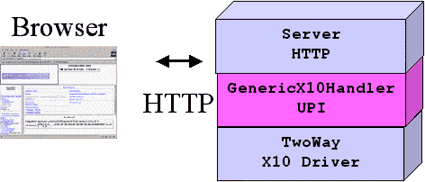
The sample X10 handler is implemented with two classes: an abstract class, GenericX10Handler.java, which provides a URL interface to a generic X10 interface device, and TwoHandler.java, which maps the generic X10 interface device onto a specific device, such as the TwoWay power-line interface module. The handler provides URLs with the ability to send commands on to the power line, and to wait for asynchronous notification of power-line events.
While sending power-line commands involves straightforward mapping of URLs to X10 commands, the asynchronous notification requires special considerations. HTTP is client driven: the client needs to initiate all requests. However, the asynchronous notification is intrinsically server driven, or server push. We implement this server push with the help of the (paradoxically named) pull applet. The applet sends a notification URL to the server, which sits and waits for a command to appear on the power line. As soon as one is available, the server wakes up and satisfies the request. The applet immediately reissues the request, causing it to wait for the next event.
You can see annotated source code for the generic X10 handler here:
Generic X10 proxy handler
We start the handler by defining a class that implements the handler interface. When we implement the asynchronous notification of power-line events, we also implement the runnable interface so we can create an instance as a background thread. The class keeps instances of the server and prefix in case the concrete subclass needs to refer to them.
Looking in server.props for all entries that begin with prefix is the standard way of retrieving the configuration properties for this handler.
By convention, the names of any parameters used by the handler are defined as static public final String. In this case, device is used to name the physical device connected to the power-line interface, and prefix defines the leading part of the URL for this handler.
The private variable MAX_Q is used internally to limit the number of asynchronous power-line messages that will be queued.
Although there is usually only one instance of a handler created by a server, there can be many requests, each in its own thread, running the respond method. For resources such as files, this presents no problem. However, in the case of X10, there is only one physical interface device, so we must limit the number of simultaneous requests to two — one sending output to the power line, and the other waiting for input. These objects, sendMutex and notifyMutex, are used as mutexes to ensure that only one request of each type is accessed at a time.
For X10, there are only a few possible commands allowed. We arbitrarily pick semimnemonic strings to represent each X10 command, and store them in the Vector cmdList. These strings will be encoded as part of the URL in the query parameter.
We can choose several different ways of encoding the commands into the URL. Using query parameters allows access to X10 commands directly from HTML forms.
The TwoWay X10 controller provides for asynchronous notification any time a command is seen on the power line. We start a background thread that listens for these commands and stuffs them on the queue.
By calling the run method, we can use TwoWayHandler as a normal handler (by implementing the handler interface), and as a background thread (by implementing the runnable interface).
For thread safety, we need to synchronize on the queue. If a client has requested an asynchronous event, and the queue is empty, it waits. The notifyAll wakes it up when an item is placed on the queue.
The init method is called by the server once, when it starts, just after the object is created (with newInstance, by the server). The server object, passed as a parameter, encapsulates all of the information that holds for all requests. The prefix string is used to identify the server properties that are specific to this handler. A reference to these parameters is stored in the object, just in case a concrete subclass needs additional server information. For example, a subclass might need to look for additional server properties.
The line:
   String deviceName = server.props.getProperty(propsPrefix +
           DEVICE, "/dev/cua/a");
is idiomatic to init methods, and represents the standard way of fishing handler-specific property information out of the server object.
Because this method is called once, just after the object is created, it is a convenient place to start the background thread. The respond method is the primary callback routine, and it is called once for every HTTP request that comes into the server.
As with the server object above, the request object also contains a reference to the server properties. The primary difference is that other upstream handlers can modify the information in the request properties, but the server properties are fixed.
It is considered good practice to examine the configuration parameters for every request, instead of only once in the init method, if the parameters are expected to change on a per-request basis. This lets another handler upstream change the parameter, which in turn allows this handler’s code to be reused in a different context.
Normally the request method is called for every handler on each request. Something like this code fragment:
    if (!request.url.startsWith(urlPrefix)) {
       log("Not my prefix: " + request.url);
       return false;
    }
is present near the top of every request method to quickly eliminate the processing of URLs that are meant for other handlers. By returning false, the server knows to pass the request on to the next handler. Once the handler has identified this request as one of its own, it needs to examine the URL (contained in request.url) to figure out what to do with it. Two common methods are used for processing URLs. The first one:
StringTokenizer fields = new StringTokenizer( request.url.substring(1),"/")
breaks the URL into its directory components. (URLs always start with a /). The second method uses the HTTP query data (the information after the ? in the URL), either directly or by placing the name/value pairs from the query into a hashtable for easy access.
In this handler, the query data contains a simple string, so request.query is used directly.
Now that we have identified the URL as belonging to the handler, we check it to make sure the parameters are valid (returning an error message if they are not) and acquire the mutex for sending a power-line command. The sendCommand method, implemented in a subclass, is responsible for actually delivering the command to the power line.
The data is returned back to the client in three possible ways:
- As a plain text file in Java properties format
- As a formatted HTML page
- As a side effect, where the data is stored in the request object, to be consumed by a subsequent handler
The type of response generated depends on the particular handler.
If the result of the handler is expected to be consumed by an applet, JavaScript, or possibly another Web server, then the output is generally in the form of name/value pairs, and returned as a plain text file in Java properties format. This is a particularly easy format for an applet to deal with because a single Properties.load() call on the URLInputStream() captures all the data in an easy-to-use manner.
An HTML page is generally returned when the result is expected to be viewed directly by a user and contains fixed information. Error messages are commonly returned as HTML files.
If the result is to be combined with other information, or if it seems like a lot of HTML code is being written in Java, then returning HTML is probably a poor choice. Instead, the handler should store the results in the request object so that another handler, such as the TemplateHandler, can combine the results with a template that will be delivered to the user as HTML. This way, the look and feel of the result display is stored in the template file, not in the Java source code, and can be changed without resorting to modifying the Java code.
Handlers that return values by adding information to the request object, which can be done by creating entries in the request.props field, should have a configuration setting that allows them to return the data as as a plain text Java properties response as well. Then the ProxyPropertiesHandler can be used as part of a server configuration to allow the handler to be run either upstream of the handler consuming the results, or on an entirely different host. (The ProxyPropertiesHandler proxies URL requests to a remote server, retrieves replies in the form of Java properties files, and inserts the results into the Request.props field.) Using this technique, handlers that would normally just run for their side effects, passing information to another handler, can instead be run on another computer. This can be particularly useful when a physical device, such as an X10 interface, is involved, and the computer connected to the hardware interface is different than the computer on which the server is being run.
Notification requests are handled similarly to command requests, but no argument checking is required. A mutex, notifyMutex, is acquired, and then the command is processed. If an event from the power line is already on the queue, it is delivered back to the client. Otherwise, the request is held:
   while (queue.size() == 0) {
       queue.wait();
   }
until an event arrives, and the background thread has been placed in the queue.
The log method provides a convenient way for the concrete subclasses to log information to the server console without requiring them to have any server-specific knowledge.
The rest of the file defines the methods that need to be implemented by the concrete classes. All the HTTP-, URL-, and server-related information is dealt with in GenericProxyHandler (which is the parent class of TwoWayHandler), so its subclasses only need to concentrate on the specifics of the particular X10 interface device.
TwoWay X10 handler
TwoWay contains the code required to handle a specific X10 power-line device. It only needs to implement the four abstract methods defined above (run, init, respond, and request). The key point to note is that the init method tries hard to communicate with the device before returning true. Returning true would indicate that a two-way device is attached, so it would make sense to register the handler. Recall that the ChainHandler expects successful unit operations to return true. The getCommand method blocks until there is something on the power line to return. Please refer to the TwoWay manual and information in the Resources section below.
You can see annotated source code for the TwoWay X10 handler here:
Final notes
We have developed more than 30 handlers for the Brazil architecture. Each of these handlers implements a small set of functionality that can be easily reused with other handlers. The Brazil programming style of minimizing the number of APIs a developer needs to understand allows developers to concentrate on the application domain, not on how to use the API — and they don’t have to worry that some feature of an API is not being used. The ability of Brazil to leverage Web browsers as a test and deployment platform without requiring significant investment in a UI component can also be utilized to quickly develop fully working prototypes.
Brazil is totally compatible with other technologies, like the Open Services Gateway Initiative (OSGI), Jini technology, and the Java Dynamic Management Kit (JDMK). Handlers for the Java Message Service (JMS) API and Java Reliable Multicast (JRMS) have been also been developed. A commercially available product similar to Brazil can be found at


