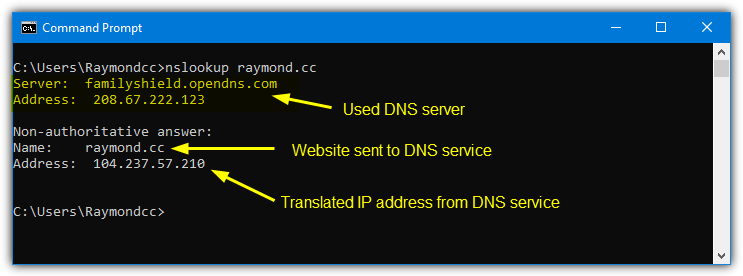
There are several factors that affect how long it takes to load a website, or whether it even loads at all. These include the status of your ISP and its network and how fast the server is where the website is hosted. Another part of the process is translating the domain name into the correct address to be read and understood by other networks. This is known as the Domain Name System, or DNS for short.
DNS is a third party service that takes a more humanly readable website name, such as Raymond.cc or Google.com, and translates it into the website’s real address which is a set of numbers known as the IP address. The IP address is then used to connect to the website. A DNS server sits in between you and the website you want to visit so it’s important the service works reliably and fast.
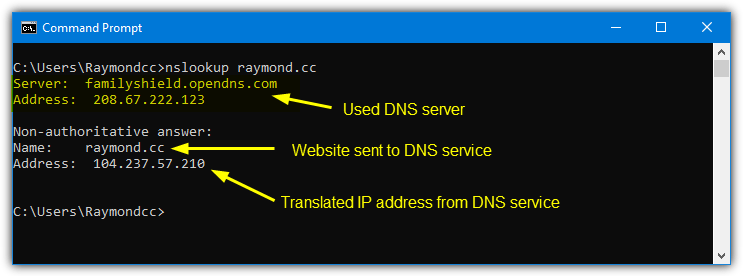
Some default DNS servers supplied by ISPs can be slow and unreliable so it makes sense to use something better. A number of DNS services also offer extra features like malicious content blocking, blocking content unsuitable for children, and even blocking advertisements. Dozens of third party DNS services are available so there’s no shortage of options to try.
It’s not difficult to change the DNS for your internet connection although the option is buried in the network adapter settings. Windows defaults to automatically using whatever DNS is configured in your router or by your ISP. Instead of digging through network settings, it makes sense to use a method that can make it far easier and quicker to try out and change your DNS settings, here are 8 ways to do it.
1. DNS Jumper
DNS jumper is a program we’ve mentioned before. It’s got enough features and options for most uses and fits into a small and portable program. A sizable 35 DNS servers are included in the list, which is the most of any programs in this article. You can add your own entry if your favorite is missing or edit the list to update services that are not working (click the blue cog icon).
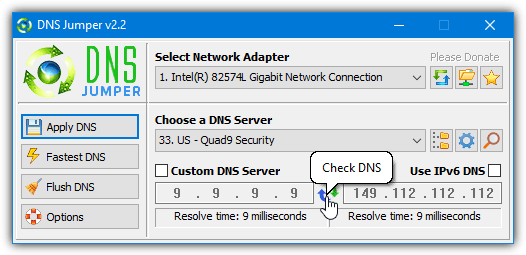
DNS Jumper is pretty easy to use, select a single network adapter or all to change the DNS of all connected adapters. Pick the DNS server to use from the drop down list and click Apply DNS. Pressing the circular blue/green icon runs a quick benchmark of both servers or you can test all servers in the list and choose the fastest. Press the “Fastest DNS” button to do that.
Although the program flushes the system DNS cache on a server change, you can flush it manually via the button if needed. DNS Jumper can also sit in the system tray where you can quickly select a DNS by right clicking the icon.
Download DNS Jumper
The creator of DNS Jumper, Sordum, also has another tool called DNS Angel. It only includes family safe DNS servers which block inappropriate content. Currently, they are OpenDNS, Cloudflare, Neustar, and Yandex.
2. QuickSetDNS
QuickSetDNS is a portable, small and simple tool by Nirsoft. It only has three DNS services included by default; Google DNS, Cloudflare, and Quad9. However, it is easy to add your own entries. For convenience, we’ve created a QuickSetDNS configuration file with around 30 extra DNS services included. Download, extract the zip, and copy the .CFG file to the same folder as the QuickSetDNS executable.
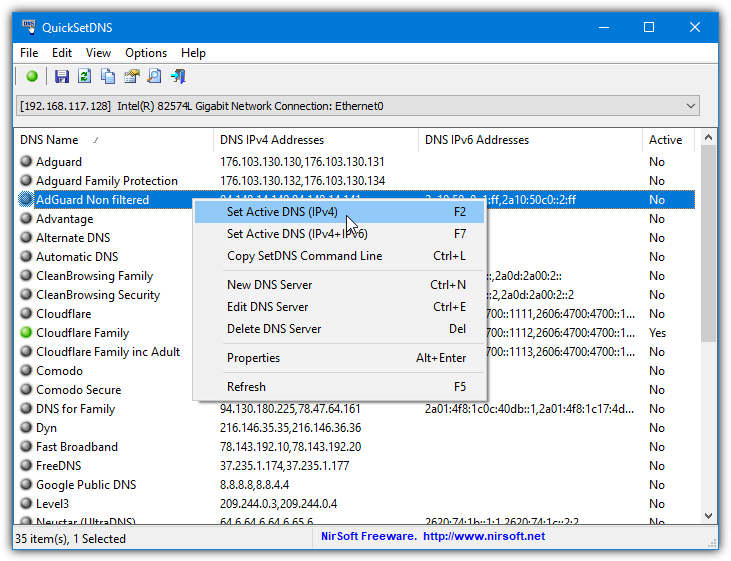
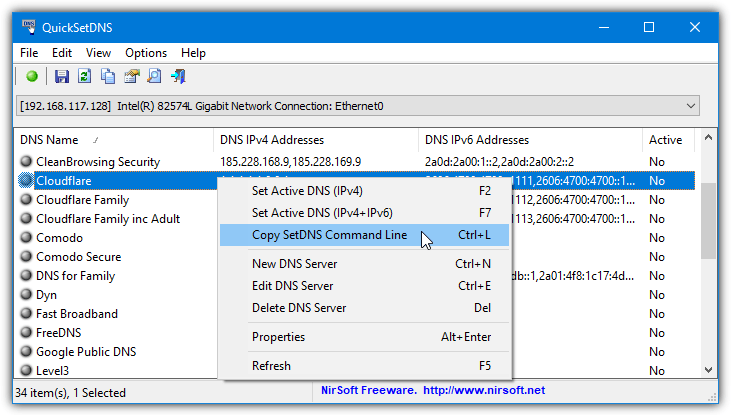
The default vanilla options are Automatic, which resets to automatically obtain, Router DNS, which manually sets the DNS to the default gateway, and the third party DNS services. To select any DNS from the list click on it and press F2, click the green toolbar button, or right click and select Set Active DNS.
Make sure the correct network adapter is selected in the drop down beforehand. Like some other tools, QuickSetDNS could do with an option to test the DNS service before applying it.
Download QuickSetDNS
Create Your Own DNS Setting Desktop Shortcut With QuickSetDNS
One reason we like QuickSetDNS is its ability to run from the command line. This means you can quickly change DNS settings by double clicking a desktop shortcut or running the command in a batch file. Here’s how to do it.
1. Run QuickSetDNS and right click on the DNS service you want to put in the shortcut. Select Copy SetDNS Command Line or press Ctrl+L which copies the required shortcut command and arguments to the clipboard.
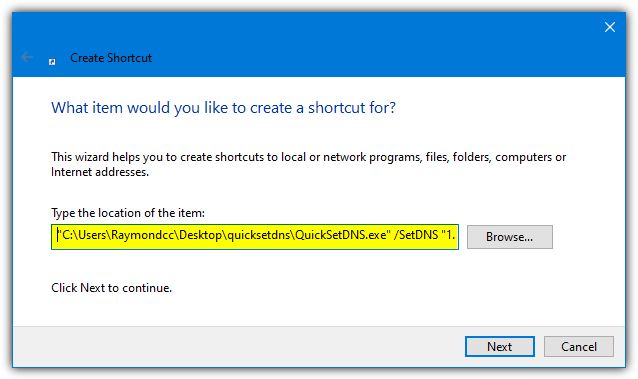
2. Right click on the Desktop > New > Shortcut. In the location box press Ctrl+V or right click and Paste. This will paste the command copied from step 1. Press Next.
3. Give the shortcut a name such as OpenDNS, Cloudflare, Google DNS, etc, then press Finish. When you double click the shortcut on the desktop the DNS servers will silently change to what you chose.
Before doing this make sure you have copied the QuickSetDNS executable to a permanent location as moving it after creating a shortcut will cause the command to fail.
3. Public DNS Server Tool
This portable tool is from the technology blog TrishTech. It’s quite basic in terms of features with no speed testing or comparison available. However, it’s nice and easy to use if you just want to change and occasionally try out different DNS servers. There are currently 23 DNS services listed in its database although some don’t work as Public DNS Server Tool has not been updated since 2018.
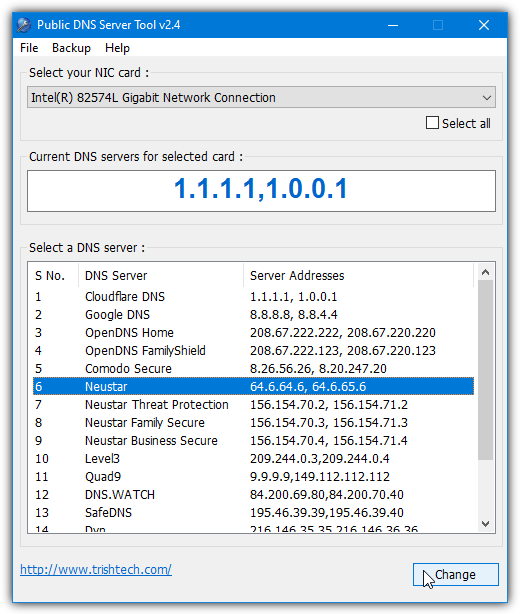
Select the network adapter to change from the dropdown at the top. Check the “Select all” box to affect all network adapters at once. Then select the DNS service to use from the list and press the Change button. After a few seconds, the current DNS display will update to reflect the change. If you want to keep your current DNS settings to restore later, use the Backup menu to backup the data to a registry file.
Custom servers can be added by editing the servers.ini file located in the program’s folder. The services that no longer work and could be edited or removed from the list are GreenTeamDNS, OpenNIC, SmartViper, FreeDNS, and Alternate DNS. Download our modified servers.ini which has removed the dead services and added a few others.
Download Public DNS Server Tool | Custom Servers.ini File
4. DNS Changer
DNS Changer is a simple to use portable tool that is open source and hosted on GitHub. Unlike other tools mentioned here, DNS Changer includes the option to set up DNSCrypt which adds an extra layer of security by encrypting your DNS traffic. Click the “DNSCrypt configuration” link button in the program window to download, install and set up DNSCrypt.
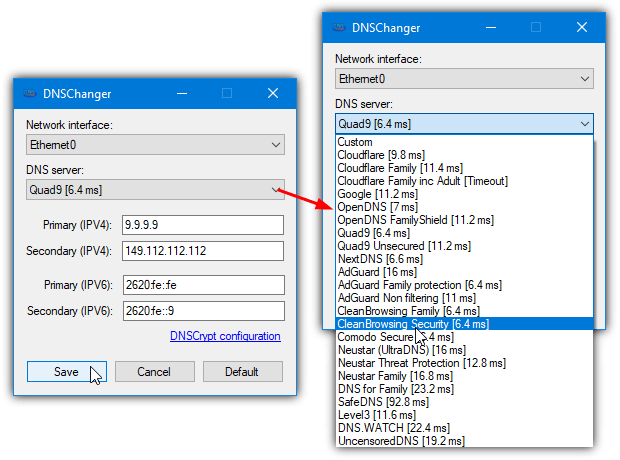
There are nine DNS services included by default, including Google, Cloudflare, OpenDNS, AdGuard (three options), and Quad9. When you launch DNS Changer it will run a speed test of those services and list the response times in the drop down list. Simply select the network adapter that you want to change the DNS for, select the DNS service and click Save. Choose Custom to add a service that isn’t listed.
Note: As you cannot edit the default list of servers in DNS Changer, we’ve created a slightly modified version from the source code that increases the number of included DNS servers to 23. Nothing else is changed, including any possible bugs or glitches in the original code.
Download DNS Changer | DNS Changer Modded Server Version
5. Smart DNS Changer
Smart DNS Changer is an interesting tool with several potentially useful features. However, it does have a few drawbacks ranging from the rather cluttered user interface to the ads in the main window. It also only comes as a setup installer but you can at least make a portable version by unpacking the installer with Universal Extractor. Smart DNS Changer is easy to use and only the active network adapter can be changed.
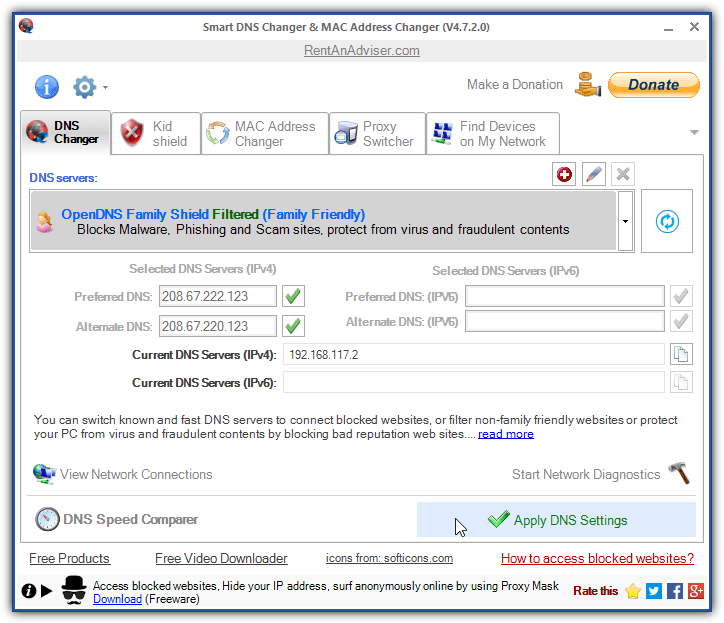
Selecting one of the 10 supplied DNS services gives you a description of its main goal, such as blocking malicious sites or adult material. Choose which service you want and press the Apply DNS Settings button. Pressing the green check mark next to each DNS will test it. You can add your own DNS servers but it helps if you know what each offers so you can add all the information into the add DNS window.
The extra features could prove quite useful. Kid Shield uses different DNS servers for different user accounts, so you can use a family oriented DNS for children. MAC Address Changer is an interesting function that spoofs the MAC address of your network adapter. Find Devices searches the local network for other devices while DNS Speed Comparer runs a speed test on two of the DNS services and tells you which was the fastest.
Download Smart DNS Changer
6. ChrisPC DNS Switch
ChrisPC DNS Switch looks like a nice all in one tool for testing and configuring your DNS settings. Sadly, there’s a free and paid Pro version and the free version has some restrictions. You can only benchmark anonymous DNS servers, cannot edit the listed servers, and cannot import a list of servers. There’s also an ad banner in the window and a popup ad window that appears periodically and on exit. It’s not portable either.
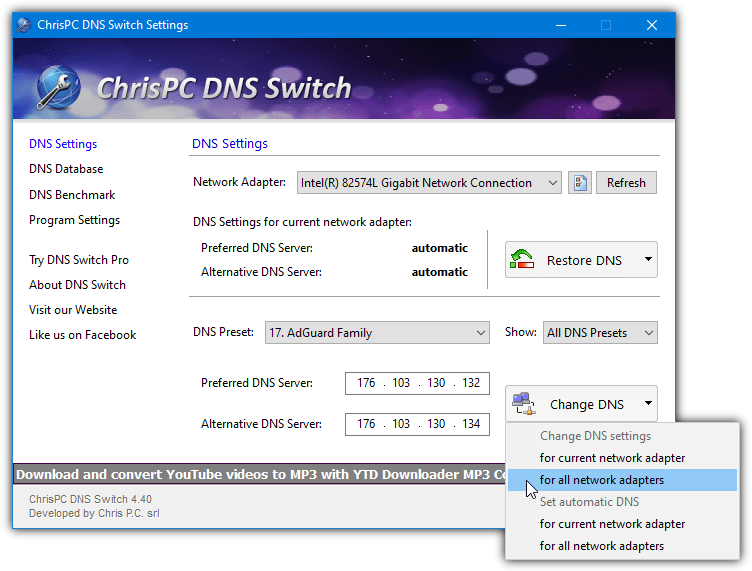
If you don’t mind the ads or restrictions, ChrisPC DNS Switch has a total of 35 DNS servers (some don’t work). Select the network adapter from the drop down and the DNS service from the other drop down and press Change DNS. You can change or restore the DNS for one or all network adapters on the computer. The Show drop down filters the services into categories of regular, secure, family safe, or anonymous.
Download ChrisPC DNS Switch
7. DNS Changer Pro
The developer, DanuSoft, is not around anymore but that’s not such a problem because changing a DNS server on your computer is the same now as it was when DNS Changer Pro was released (2013). Fifteen DNS services are listed with each having a star rating for speed and security. The ratings are partly the developer’s opinion but can be a useful indicator. The .NET Framework 3.5 is required for Windows 10/11.
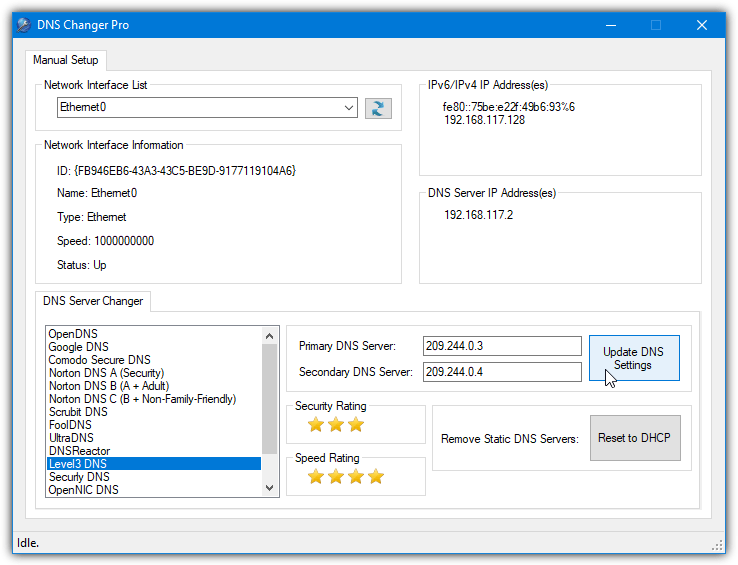
Due to its age, some services sadly no longer work. Scrubit, FoolDNS, DNSReactor, Securly, OpenNIC, Public-Root, and SmartViper did not work during testing. Make sure to select the network adapter before pressing Update DNS Settings or nothing will happen. The “Reset to DHCP” button is useful to remove any custom IP address from the network adapter and return to a dynamically allocated address.
Note: DNS Changer Pro originally came as a setup installer, which isn’t really necessary as it can easily be used portably. As a result, we’ve extracted the program from the installer and made a portable version available. You are free to download either version.
Download DNS Changer Pro | DNS Changer Pro Portable Version
8. Change DNS Server With The Windows Netsh Command
Windows has a built in command line tool called netsh that performs a number of network related tasks, including changing the DNS servers of network adapters. This is especially useful for scripts and batch files because no external tools are necessary. To set the preferred DNS server, the following syntax is required:
netsh int ipv4 set dns name=[adapter name] static [DNS server] primary
Replace DNS server with the DNS address you want to use, such as 8.8.8.8 for Google. For the adapter name you need to know the name of the network adapter, it’s usually something like “Ethernet”, “WiFi” or “Local Area Connection”. Type “netsh int show interface” into the Command Prompt for a list of adapters. Alternatively, look at the network connections window in Control Panel or Network Status in Settings.
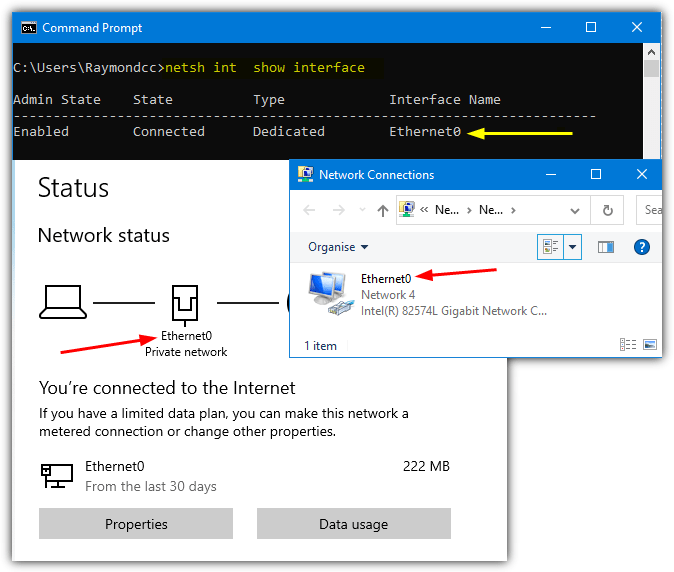
A typical command would look something like this:
netsh int ipv4 set dns name=”Ethernet0″ static 8.8.8.8 primary
Adding an alternate DNS server requires a slight change to the command:
netsh int ipv4 add dns name=[adapter name] [DNS server] index=2
While the first command uses set to add the primary DNS, the second uses add and index=2 for the alternate DNS. For setting the alternate DNS to Google, use something like:
netsh int ipv4 add dns name=”Ethernet0″ 8.8.4.4 index=2
Then put both commands into a batch file and add an “ipconfig /flushdns” to clear the current DNS cache. To set the DNS servers automatically for all enabled network adapters you can download a small batch script. Open the script and edit the DNS1 and DNS2 values to your preferred and alternate DNS servers, then run the batch as administrator.
